The Starburst Bevel: A Simple Solution for Enhanced Esthetics and Retention
Developing a protocol for your Class IV technique is essential for attaining predictable and long-lasting esthetic restorations. Depending on the size of the Class IV and the presence of incisal translucency and surface characteristics of the adjacent teeth, for instance, your anterior composite protocol should also be both flexible and versatile. Layering of composite materials available in multiple shades and opacities and finishing and polishing techniques to allow you to better adapt your technique is critical to an excellent restorative result. However, it is equally important that you establish a consistent approach to your bevel design. In addition to esthetics, hiding the fracture line and bonding failures are significant challenges in these cases. This makes bevel design a significant consideration in seamlessly blending your restoration into the surrounding tooth structure while providing the highest degree of retention for long term service.
"The starburst design allows light to diffuse and refract in a way that hides the junction between tooth and restoration better than a flat, traditional bevel."
The term retention has taken on an increasing significance in the dental world. Retention of the restoration has always been a cornerstone of the successful longevity
of direct and indirect restorative dentistry. Retention also refers to the ability to retain a patient of record. Failure of a restoration in the esthetic zone is often not
tolerated well by the patient due to its social, economic, and degree of inconvenience, and may undermine the confidence a patient has in their dental team. Thanks
to a higher dental IQ, the dental public holds higher expectations of restorative quality in both esthetics and life span. The source from which a patient obtains dental
information and its esthetic and functional potential is no longer limited to the dental office. Social media and the internet have become popular media through which
our patients gain insight into their existing or desired dental treatment possibilities. It is not uncommon for an unhappy patient or one seeking a new dentist to choose a dentist based on positive internet reviews.

FIG. 1
A young woman presented with a mesio-incisal fracture on tooth #8, previously restored one year earlier.
The following case illustrates how the fracture of a recently placed Class IV restoration created the scenario where a patient began her internet search for a new dentist. Positive online reviews of our dental office were responsible for bringing a young woman to our office. She presented with a mesial-incisal fracture of tooth #8 that had been restored one year earlier. (FIG. 1) In addition to the obvious disappointment of losing the restoration, she admitted to disliking the esthetics of the previous “bonding” in the first place.
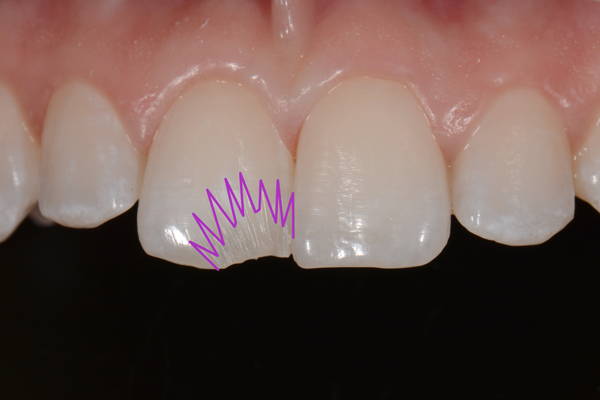
FIG. 2
A starburst bevel provides a larger surface area to increase the strength and longevity of the bond. In addition, the junction between the restoration and tooth was disguised through enhanced diffusion and refraction of light.
This relatively small incisal fracture was best suited for a direct composite and no local anesthetic was necessary. After shade selection, the anterior teeth were isolated using a Comfort View Lip and Cheek retractor (Premier). This provided both the isolation essential for ideal bonding conditions as well as the visibility necessary to mimic the shape, profile, contour and surface characteristics of the adjacent dentition. A starburst bevel was placed using a coarse, flame-shaped diamond bur. (FIG. 2) The bevel progressed from being deeper at the fracture line to more superficial and fading into the enamel. In addition to providing more surface area for increased bond strength and retention, the starburst design allows light to diffuse and refract in a way that hides the junction between tooth and
restoration better than a flat, traditional bevel.
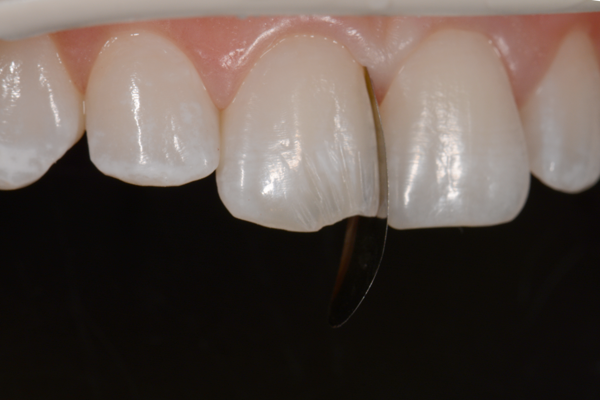
FIG. 3
A kidney-shaped, stainless steel sectional matrix band was placed vertically between teeth #s 8 and 9. The contour of this matrix band established a natural looking proximal surface that required little finishing.
A kidney bean-shaped metal bicuspid sectional matrix, oriented vertically, was placed between teeth #8 and 9. (FIG. 3) This isolates #8 while the etch and adhesive bond is placed as well as providing a better convex initial proximal contour compared to a mylar strip. Max Etch (Clinician’s Choice) was placed over the preparation, slightly beyond the starburst bevel, for 15 seconds. Max Etch is a viscous 35% phosphoric acid that holds firm vertically for the duration of the etch. Once the etch is thoroughly rinsed off the tooth, Peak Universal (Ultradent) was scrubbed into the enamel and dentin for 20 seconds. Peak Universal is easily applied due to its applicator syringe and brush combination and provides a high strength bond to both enamel and dentin. The air-thinned adhesive was then light-cured using a VALO (Ultradent) for 10 seconds. I prefer the Valo X (Ultradent), however it is essential that your choice of curing light has broad-wavelength curing capabilities, a large surface area and a consistent strength, ideally 1000mW/cm2, over the entire surface of this area.
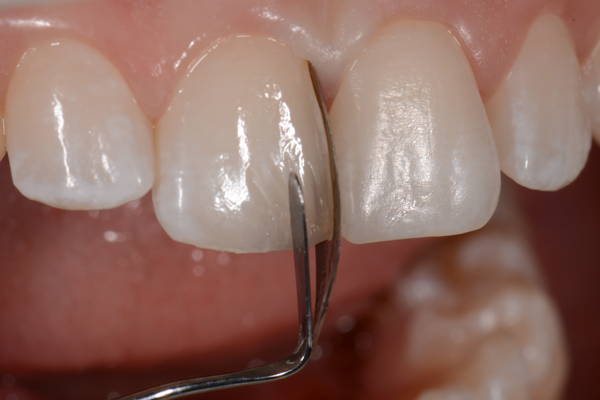
FIG. 4
The translucent lingual enamel layer of Evanesce Enamel Clear (Clinician’s Choice) was placed into the preparation. Through successive “chopping” motions with a composite instrument, this layer was blended into the deepest aspect of the bevel and left with a variegated appearance, forming a more organic junction with the next layer of composite.
The starburst bevel is the first step in helping the restoration disappear. The next step was the careful placement of a translucent lingual enamel layer using Evanesce Enamel Clear (Clinician’s Choice). I favor a syringe over a compule in the anterior, not only to reduce waste, as you dispense only what is needed, but also to eliminate folds or voids when dispensing the composite. Evanesce ENC was carried to the preparation with a paddle shaped ARTE spatula (LM-Dental) and adapted to form the lingual layer against a gloved finger. The lingual layer was kept relatively thin, being brought just into the deepest aspect of the bevel. (FIG. 4) At this stage, the ENC was blended into the base of the starburst bevel and was “chopped” using the ARTE spatula to create a variegated appearance and interface with the subsequent layer of composite. The Evanesce ENC was then light-cured for 10 seconds from the facial and 10 seconds from the lingual. This organic interface, compared to one that is flat, allows light to better reflect and absorb in a way that mimics natural tooth structure, helping the restoration disappear. In the case of a larger Class IV, I would build the entire proximal wall against the metal sectional matrix band first then establish the lingual layer using a gloved finger as a lingual matrix. The next layer required a more opaque and brighter composite to hide the tooth-restoration junction. The brightness and higher opacity of Vit-l-escence Opaque Snow (Ultradent) is very effective for the purpose of hiding the fracture line. Opaque Snow was adapted onto the preparation using the ARTE spatula and “chopped” into the ridges straddling the translucent lingual layer and the enamel bevel. (FIG. 5) This opaque layer was light-cured for 10 seconds each from the facial and lingual.
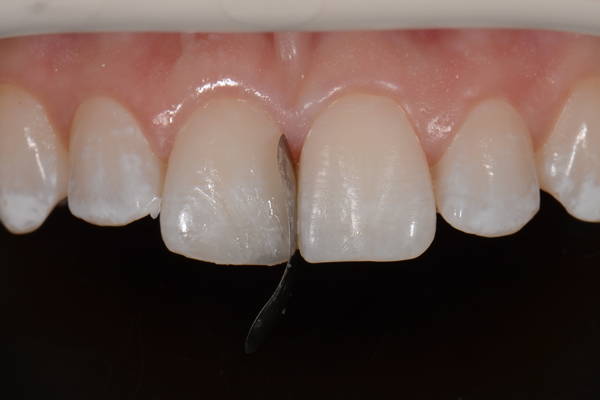
FIG. 5
Vit-l-escence Opaque Snow (Ultradent) was layered over the lingual layer and onto the enamel layer. The addition of this very bright and very opaque composite effectively masked the fracture line.
Evanesce A1U (Clinician’s Choice) was placed as the final, or body layer. This composite was chosen for its chameleon-like shade blending, and its ability to finish quickly and polish to a super high shine. Once placed and spread onto the tooth with the ARTE spatula, a composite brush lightly wetted with ResinBlend LV (Clinician’s Choice) was used to further blend and smooth the facial layer of composite into the uncut enamel. (FIG. 6) The use of ResinBlend LV produces a very smooth final surface that significantly reduces finishing time. At this point, the restoration was lightcured from the facial and lingual for 10 seconds.

FIG. 6
The final layer of composite, Evanesce A1U (Clinician’s Choice), was placed into the preparation, then smoothed and blended into the facial surface using a #3 composite brush lightly coated with ResinBlend LV (Clinician’s Choice).
Once the metal sectional matrix band was removed, the finishing and polishing protocol started with evaluating the primary anatomy. As this was a relatively small Class IV, the occlusal contacts were quickly checked and adjusted as was the accuracy of the incisal edge placement. Taking the time to smooth and blend the final layer of Evanesce A1U using ResinBlend LV left an ideal restorative surface that was essentially ready for polishing. The only finishing required was the mesial aspect of the restoration that was in direct contact with the metal matrix band. This was adjusted and gently rounded using a coarse Sof-Lex polishing disc (3M) as was the proximal line angle until it lined up with the more cervical aspect of the natural line angle. The adjacent tooth structure displayed some subtle surface texture.
This was easily replicated on the restoration using a coarse, round-ended, tapered diamond applied without water and at low RPMs. This was also effective in lobe development in addition to the textured facial surface.
Once the secondary and tertiary anatomy is carefully established, it makes sense to use an effective and efficient polishing system that isn’t aggressive. Therefore, polishing of this Class IV consisted of the spiral Jiffy Finishing and Polishing System (Ultradent). The first polisher was applied with a light touch in a wiping motion at 8-10,000 RPMs for 30 seconds. This polisher prepares the composite surface for the final polisher and although not desirable in this case, is capable or removing small scratches and bur marks. T he final polisher was used in a similar manner with a slightly lighter touch for another 30 seconds. Alternatively, I also use the A.S.A.P. 2-step diamond polishing system (Clinician’s Choice) which is also ideal for quickly attaining a high gloss finish while maintaining the desired anatomy
and surface texture.
The patient was extremely pleased with the final result. (FIG. 7 and 8) Moreover, the attention paid to blending the composite into the tooth for an invisible restoration also created maximum retention in order for her to avoid another unfortunate negative dental experience.
Each step of your Class IV composite protocol should add confidence and predictability to the desired result. Adopting the starburst bevel to your anterior composite technique increases the potential for improved retention through strengthening of the adhesive bond. The starburst bevel is also exceptional in its ability to optically enhance the esthetic potential of the composite, and performs both of these without adding a step, material or additional instrumentation. It is within our clinical and professional purview, and in our patients’ best interest, to continue to improve and adopt techniques that lead to better clinical results. At least in this case, that can
lead to improved retention of both restoration and patient.
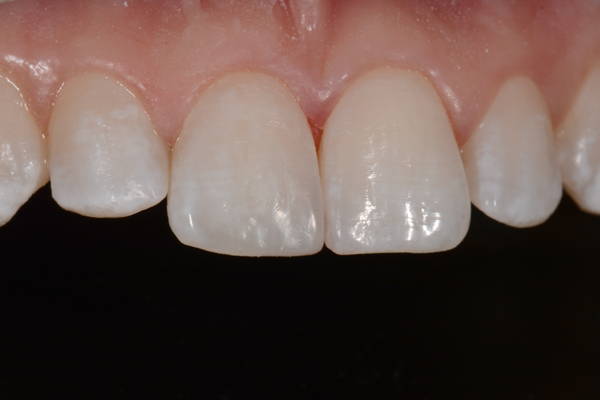
FIG. 7
Immediate post-op. Class IV restoration is indistinguishable from the surrounding tooth due to the combination of the starburst bevel design and optimal esthetic properties of Evanesce composite.

FIG. 8
Post-operative full-face portrait view.
About the Author

Susan McMahon, DMD, AAACD, FAGD
Dr. McMahon owns the largest cosmetic dental practice in Western Pennsylvania. She is accredited by the American
Academy of CosmeticDentistry, and a Fellow of the prestigious American Society for Dental Aesthetics and a Fellow in the Academy of General Dentistry. An author and
lecturer, Dr. McMahon has devoted her professional
career to the pursuit of advanced technologies in cosmetic and minimally invasive dentistry. She frequently lectures
across the United States on minimally invasive dentistry, technology and conservative cosmetics. She has been voted by her peers as a Top Pittsburgh Dentist every year for over
20 years.
Discover More
This article was originally published in the Clinical Life™ magazine: Fall 2023 edition
Clinical Life™ magazine is a premier periodical publication by Clinical Research Dental Supplies & Services Inc. Discover compelling clinical cases from Canadian and US dental professionals, cutting-edge techniques, product insights, and continuing education events.
Subscribe to our emails to receive articles like this and be notified about our exclusive promotions.