Patient Management and Treatment of the Midline Diastema

A treatment plan is likely to be accepted by a patient if there is, at a minimum, a faith in the dentist that the restorative result will reflect the patient’s desired outcome at the agreed upon cost and timeline. This is especially true with a new patient with whom there is little or no shared dental experience. Any treatment plan requires a thorough investigation and assessment of clinical findings and is necessary to present treatment options and promote the patient’s understanding and ownership of their existing dental condition and its impact on the restorative result. There is a burden of responsibility to collect as much information from the patient as it relates to all aspects of treatment. However, this responsibility does not end with the clinical examination of hard and soft tissues, radiographs, photos, models, and medical history. Taking time to establish a rapport, delving into past dental experiences, and attempting to assess their potential as partners in the restorative process is essential to mitigate any challenges once treatment begins. Trust in the clinician can build as the case progresses, allowing the patient to “keep the faith”, as the patient’s ongoing engagement and cooperation can be critical to obtaining the desired clinical result.


Such was the case when a young woman presented as a new patient seeking options to improve the appearance of her “flat front teeth”. (FIG. 1)
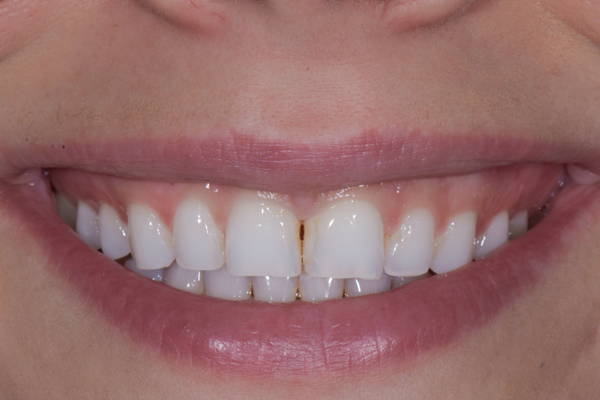
Smile with midline diastema

FIG. 1

A young woman presented for treatment options to “fix her flat front teeth”. The accepted treatment plan involved short-term aligner therapy followed by a midline diastema closure and lengthening of the maxillary central incisors
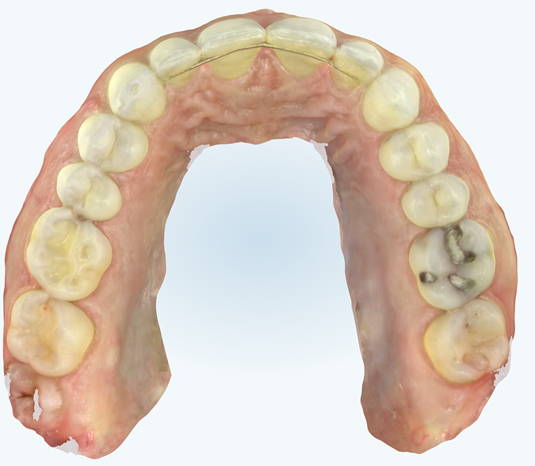
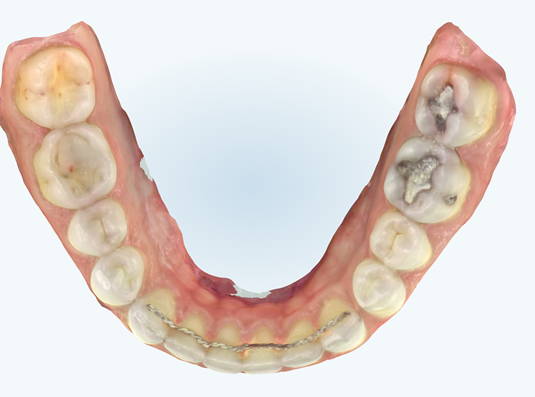
A comprehensive clinical examination revealed advanced incisal wear on teeth #6-11, a constricted bite, fixed wire retention on teeth #7-10 and #22-27 along with failing and unaesthetic composite restorations in the posterior and anterior dentition. The treatment plan presented, and accepted, involved the correction of the restricted bite and establishing a more harmonious occlusion through Invisalign (Align Technology) orthodontics, along with the replacement of the posterior composites. Lengthening of the central incisors to address the incisal wear would be undertaken only after this was achieved. This treatment plan was complicated through the necessity of removing the fixed lingual retentive wires prior to the aligner therapy as it was anticipated that the removal of this fixed retention and orthodontic movement would result in the re-appearance of the patient’s natural midline diastema. This added the necessity of closing the diastema in addition to lengthening the central incisors. While this was foreseen and the patient was informed of the possibility of the diastema reforming, she nonetheless presented for an orthodontic recall appointment visibly frustrated and agitated. Her heightened level of anxiety was due to the amount of time involved for Invisalign therapy and questioning the ultimate esthetic outcome of her treatment. Her fear stemmed from the presence of the diastema and that longer, wider central incisors may take on a “Bugs Bunny” appearance. The patient was subsequently calmed and faith was restored that treatment was progressing as anticipated, agreeing to continue with the aligner therapy.

Once the orthodontic goal of the treatment plan was achieved, the restorative phase entailed the closure of the midline diastema and lengthening and recontouring of teeth #8 and 9. Itero (Align technology) scans of the maxillary and mandibular arches (FIG. 2A, 2B) were obtained from which diagnostic models were fabricated.
Scan of upper teeth
Scan of lower teeth

FIG. 2A & 2B

Scans of the mandibular and maxillary arches were obtained. Models were made from these and mounted. Wax-ups of the ideal restorative result were then fabricated on these mounted models.

A wax-up of the ideal incisal length of the maxillary central incisors was fabricated on the mounted models. The wax-up provided the ideal incisal length and thickness, facial and lingual contours, and occlusal contacts of teeth #8 and 9. However, until the re-emerging diastema has stabilized, the width of these teeth would be difficult to be determined. A lingual matrix was fabricated utilizing the diagnostic wax-up by extruding Template Ultra Quick Matrix Material(Clinician’s Choice) along the anterior lingual surface of maxillary model, up to and including the facio-incisal line angle of the anterior teeth. While primarily used for the fabrication of a provisional matrix, the accuracy of Template is ideal for capturing the optimal lingual contours and incisal edges of teeth #8 and 9 established in the wax-up. The lingual matrix was replaced intra-orally in order to check the accuracy of its fit. (FIG. 3) A line corresponding to the incisal extent of the prepared teeth was scored onto the lingual matrix using a sharp explorer. The lingual matrix was then set aside.
Patient biting into purple matrix material

FIG. 3

The lingual matrix is replaced on the prepared teeth to verify its accuracy of fit. A lingual matrix, using Template Ultra Quick Matrix Material (Clinician’s Choice), was made from the wax-up. This allowed for the established, desired lingual contours and incisal edge locations to be accurately transferred to the preparations on teeth #8 and 9.
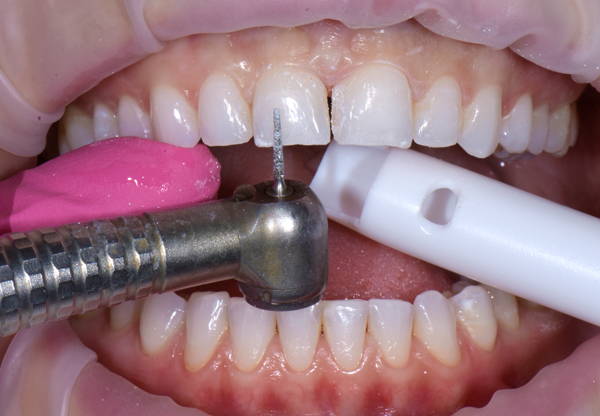
The patient was anesthetized due to the removal of existing composite as well as the possibility of wedge placement during the finishing stage. Shade selection was achieved by placing small round samples of possible composite shades onto the facial surface of teeth #8 and 9. These were light-cured and a black and white photo of the selected shade was taken to confirm the correct value of the shade. Evanesce composite (Clinician’s Choice) was selected for this case because of its handling qualities, specifically its smoothness in spreading across the tooth surface, its ability to easily blend into the surrounding tooth structure, its polishability, and the absence of air bubbles. An Optragate Retractor (Ivoclar) provided a clear, wide field that allows context for consistency in restoration shape, inclination and emergence profile with the adjacent teeth. Existing composite restorations were removed from the mesial surfaces of teeth #8 and 9 using a F8888 fine diamond bur (Brasseler) at high speed while establishing a starburst bevel on the facial surfaces. (FIG. 4) A coarse Contours Finishing and Polishing Disc (Clinician’s Choice) was used to smooth out any sharp edges or points. Finally, a PrepStart (Danville) air abraded the prepared surface to remove any enamel and composite debris and enhance overall adhesion. (FIG. 5)
Bur touching upper anterior tooth

FIG. 4

Once the existing midline restorations were removed, a starburst bevel was established on the facial surfaces of teeth #8 and 9 using a F8888 (Brasseler) fine diamond bur. A short bevel was placed on the lingual of these teeth.
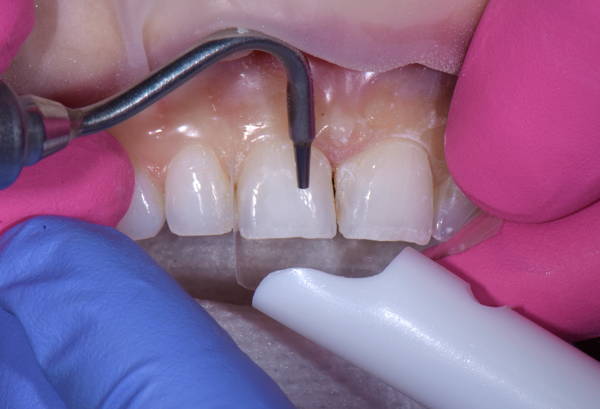
Air-abrasion system removing upper teeth debris

FIG. 5

A PrepStart air-abrasion system (Danville) was used on the facial and incisal to remove unwanted tooth and composite debris and aid in increasing the overall quality of the adhesive bond.
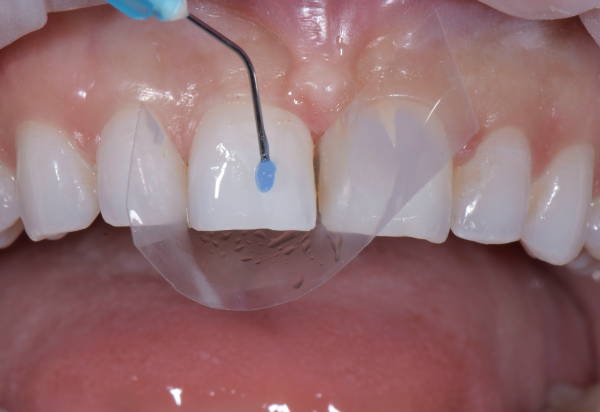
Mylar strips isolated teeth #8 and 9 from the adjacent teeth while the facial and lingual surfaces were etched with 35% phosphoric acid for 20 seconds (FIG. 6) then thoroughly rinsed. Adhese Universal (Ivoclar) adhesive was applied to the etched surfaces (FIG. 7), air- thinned and light-cured. The intent was to establish the desired length of the restored teeth first by placing the lingual shelves, then closing the midline diastema before finishing the incisal aspect of the restorations. A thin layer of Evanesce Enamel White (Clinician’s Choice) was placed into the incisal portion of the matrix up to the scribed line for both teeth #8 and 9. This lingual layer of Evanesce Incisal White, at 70% opacity, represents the ideal translucency, contours, and occlusal contacts of the lingual enamel in this case and served as a backstop for the subsequent application of the dentin layer. The uncured, uniformly thin, lingual shelves are then attached to the prepared teeth by replacing the lingual matrix back onto the teeth and adapting the uncured composite onto the preparation using a #3 composite brush lightly coated with ResinBlend LV (Clinician’s Choice) and an REJ #4 composite instrument (Clinician’s Choice). (FIG. 8) The lingual shelf was light-cured with the Template matrix in place.
Anterior upper tooth having etch applied to it

FIG. 6

With a mylar strip providing isolation from the adjacent teeth, the facial surface of the tooth was etched with 35% phosphoric acid beyond the starburst bevel, and carried over to the lingual surface, for a total of 20 seconds.
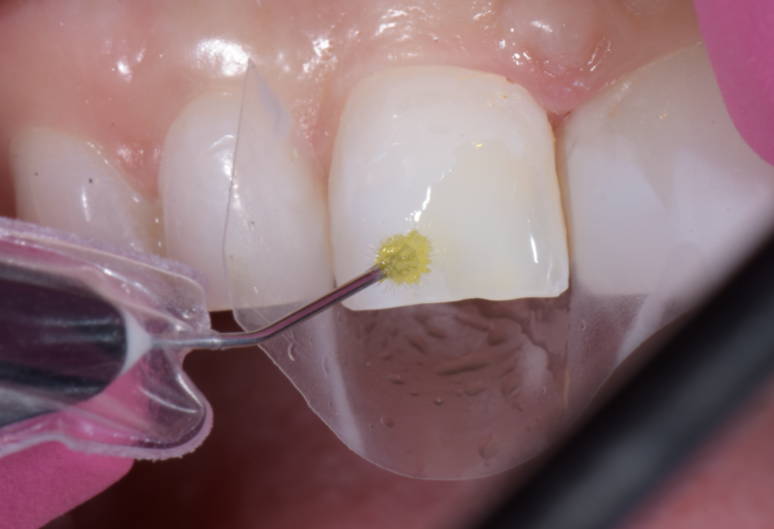
Metal tip with scrubbing tip applying universal adhesive to tooth

FIG. 7

Once the etch was thoroughly rinsed from the prepared tooth, a single layer of Adhese Universal adhesive (Ivoclar) was scrubbed onto the etched surface for 20 seconds, then air-thinned and light-cured
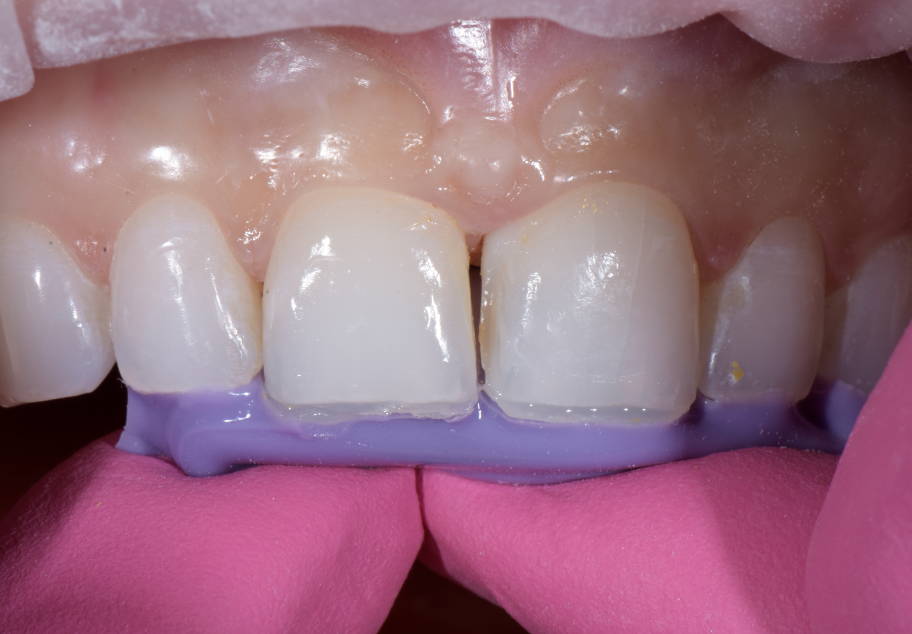
With the incisal length established, restoring the midline diastema could be completed with a more predictable proximal contour. Using a caliper, the widths of the individual central incisors and the total distance from their distal surface to distal surface was measured in order to determine the ideal width of each individual restoration required to close the midline diastema. There are several techniques for diastema closure. In my hands, utilizing the pull-through technique with a mylar strip provides the most control of proximal contact development and initial emergence profile. It is essential to use a composite for this technique that has enhanced handling characteristics in addition to being highly esthetic in order to be easily manipulated into place and disappear into the surrounding tooth structure. This technique was used on tooth #9 using a single layer of Evanesce A1U composite (Clinician’s Choice). The Evanesce A1U was extruded onto the central area of the preparation and spread into place. An REJ #4 composite instrument and the Composite Ninja (Clinician’s Choice) easily sculpted and shaped the composite interproximally, limited by the mylar strip. (FIG. 9) The pull-through technique was used at this point to create a uniform proximal surface and contact while maintaining an overhang-free emergence profile.
Teeth with thin layer of composite biting into purple matrix material

FIG. 8

Very thin layers of Evanesce Enamel White (Clinician's Choice) were placed in the incisal area of teeth #8 and 9 within lingual matrix and this matrix was replaced on the teeth. This layer was then attached to the preparation using a combination of an REJ #4 composite instrument (Clinician’s Choice) and a #3 composite brush lightly coated with ResinBlend LV (Clinician’s Choice). These lingual shells were light-cured in place.
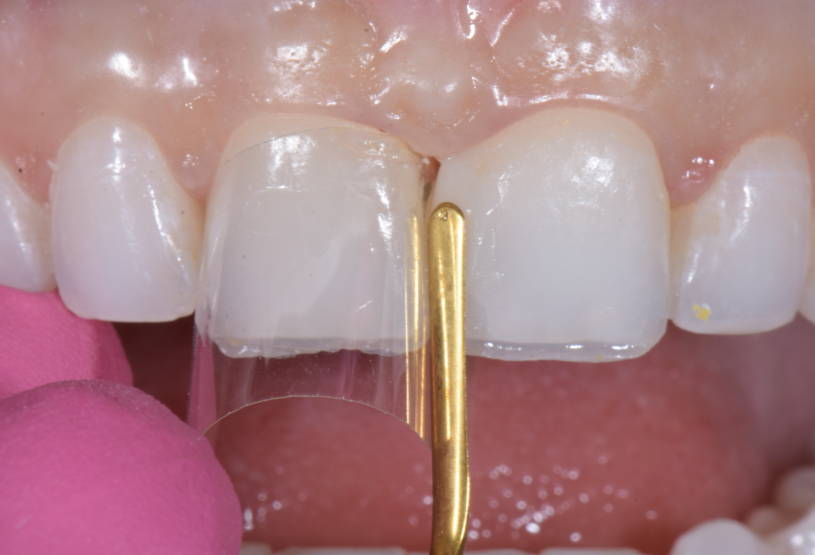
Mylar strip surrounding anterior upper tooth

FIG. 9

With a mylar strip separating tooth #9 from the adjacent teeth, Evanesce A1U (Clinician's Choice) was adapted to the mesial surface using an REJ #4 composite instrument. The pull-through technique was utilized to ensure an ideal proximal contour, natural contact area and emergence profile.
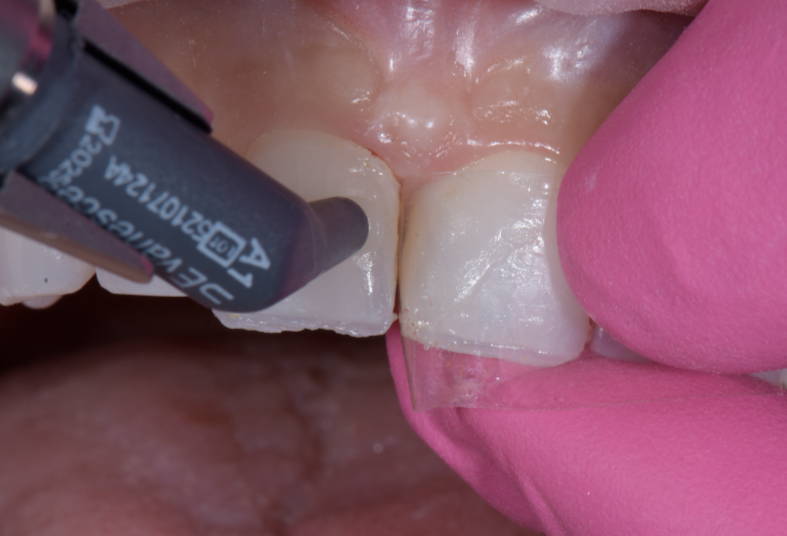
A #3 composite brush with ResinBlend LV smoothed and blended the Evanesce A1U into the facial tooth structure after the pull-through, producing a surface that required minimal finishing. The restoration was light-cured from the facial and lingual. The identical sequence of Evanesce A1U composite placement was repeated on tooth #8. (FIG. 10)
Composite compule applying material to tooth

FIG. 10

The exact technique for placement and adaptation of Evanesce A1U composite was repeated on tooth #8 in order to close the midline diastema.

By utilizing the pull-through technique and creating the desired contours and surface smoothness prior to polymerizing, it was possible to immediately proceed to completing the incisal portion of the restorations. The relative translucency of the Evanesce Enamel White was not sufficient to replicate the existing incisal translucency of the adjacent teeth; therefore, a grey tint was added in this area. A thin increment of Evanesce A1U was placed over the Enamel White layer and light-cured. A small amount of grey tint was placed onto the A1U of both teeth #8 and 9 with a CompoSculpt #1/2 (Hu-Friedy). Any excess tint was blotted using a microbrush. Once this application of tint was light-cured and assessed, the final layer of Evanesce A1U was placed over this and adapted to the facial
surface of each tooth. Once again, a #3 composite brush lightly coated with ResinBlend LV was used to smooth and blend the A1U over the tooth surface and composite from the diastema closure.

If a well-organized approach to the restorative phase is followed, there is need for minimal finishing prior to polishing. A wax-up on mounted models that reflects the desired restorative result and accurately transferring this information directly to the preparation ensures that the lingual contours and incisal edge location and thickness are already established. Taking the time to place, shape and blend the remaining composite prior to light-curing can limit the need for further adjustments. Regardless of the amount of finishing anticipated, a methodical finishing protocol keeps this step predictable and time efficient.

In this case, the finishing protocol involved the placement of a wedge prior to adjusting. This initiated tooth separation that would increase the access and accuracy to adjust the emergence profiles later in the protocol. Once the length and inciso-facial line angles were confirmed, the facial planes and proximal line angles were surveyed. The side of a pencil lead was used to outline the proximal line angles on both the restorations and adjacent teeth and compared. A coarse Contours Finishing and Polishing Disc (Clinician’s Choice) was used to correct the proximal line angles to better reflect those on the lateral incisors. (FIG. 11) Axial inclination was assessed through visualizing from various cervical, incisal and proximal angles and adjusted accordingly with the same coarse disc. The
sequence of medium, fine and super-fine discs was followed to prepare the restorations for polishing. (FIG. 12)
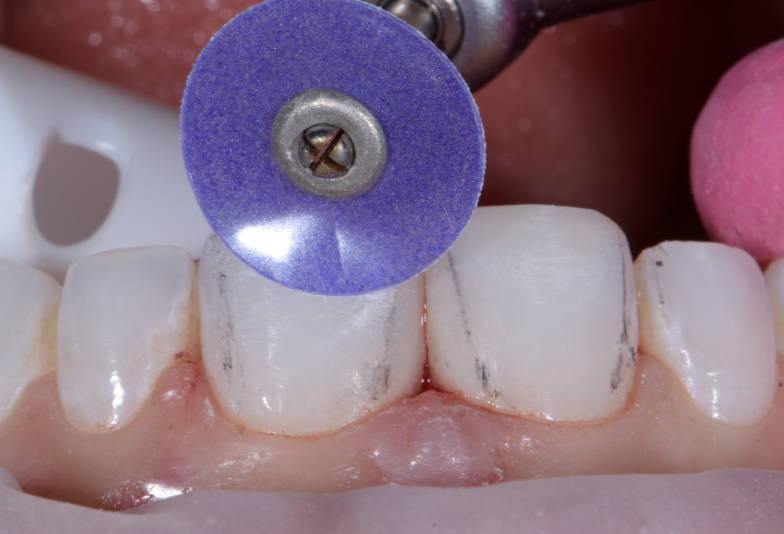
Purple polisher polishing upper anterior tooth

FIG. 11

Pencil lines drawn on the restored and adjacent teeth provide a visual guide to the placement of the proximal line angles. A coarse Contours Finishing and Polishing Disc (Clinician’s Choice) was used to “move” these line angles into their natural positions.
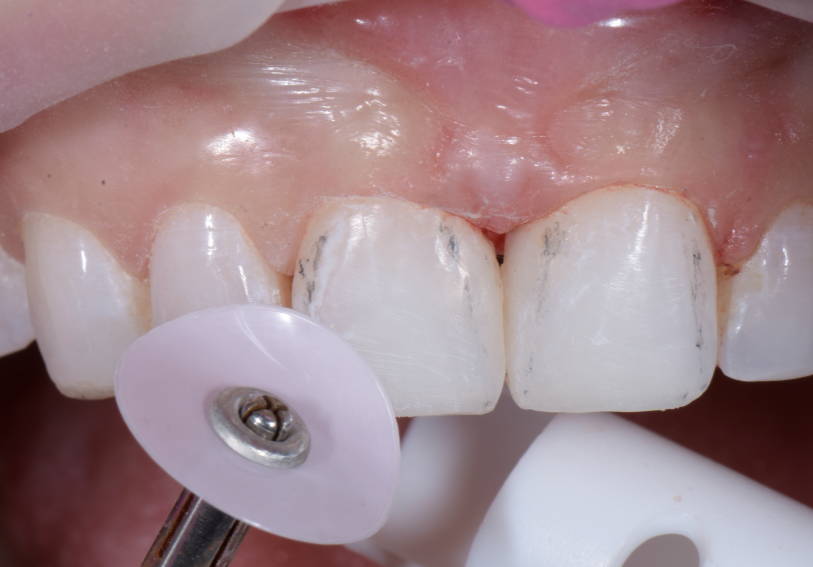
Pink polisher polishing upper anterior tooth

FIG. 12

Once the adjustments of the axial inclination, incisal length and location and proximal line angles have been made, the sequence of Contours Discs was followed from medium to fine to super-fine to prepare the restorative surfaces for the polishing steps.

This patient did not display any significant facial lobes, depressions or surface texture. Should this have been necessary to establish, a F8888 (Brasseler) fine flame-shaped diamond is ideal. A sweeping motion at low speed is effective for texturizing the smooth surface as well as developing lobes prior to polishing.

A.S.A.P. Polishers (Clinician’s Choice) were used to obtain a high luster that was present on the adjacent teeth. The purple Pre-polisher initiated the polishing sequence. At 10,000 RPMs and moderate pressure, it took approximately 20 seconds to prepare the composite surface for the Final High Shine polisher. Using the same speed but a lighter touch, the peach colored Final Polisher required the same amount of time to complete the polishing sequence. (FIG. 13) While A.S.A.P. Polishers can bring out a very high luster, this was further enhanced using a small amount of Enamelize Aluminum Oxide Polishing Paste (Cosmedent) on a Final
Shine Cotton Polishing Wheel
(Clinician’s Choice) with a light touch. (FIG. 14) The resulting restorations on teeth #8 and 9 were met with enthusiastic approval from the young patient. (FIG. 15)
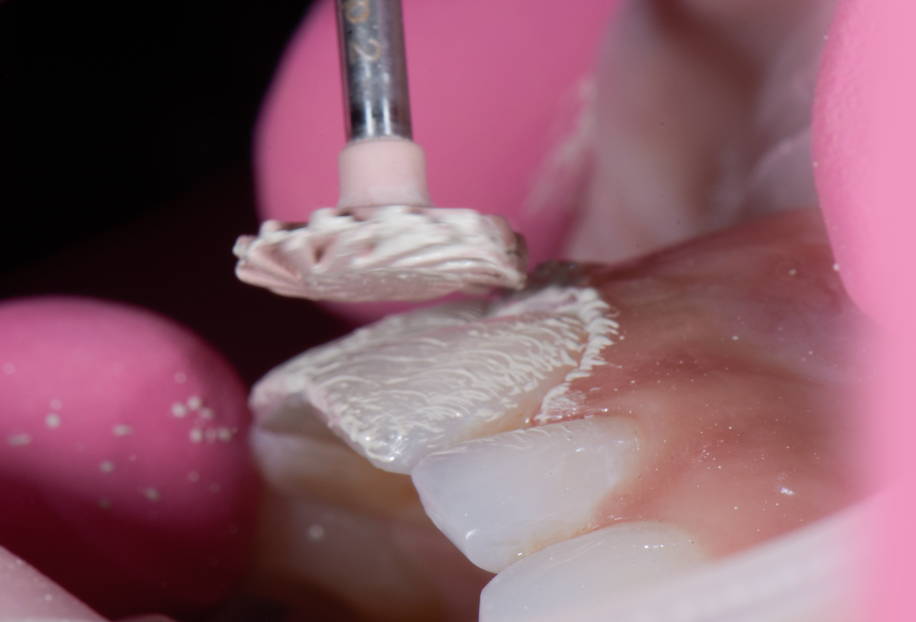
All surface polisher polishing teeth

FIG. 13

The polishing of the Evanesce A1U composite to a high luster was completed using the A.S.A.P. 2-step diamond polishing system (Clinician’s Choice) in under 1 minute. The purple Pre-polisher was used at medium pressure for 15 to 20 seconds before switching over to the peach Final High Shine Polisher (seen here) for an additional 15-20 seconds under light pressure.
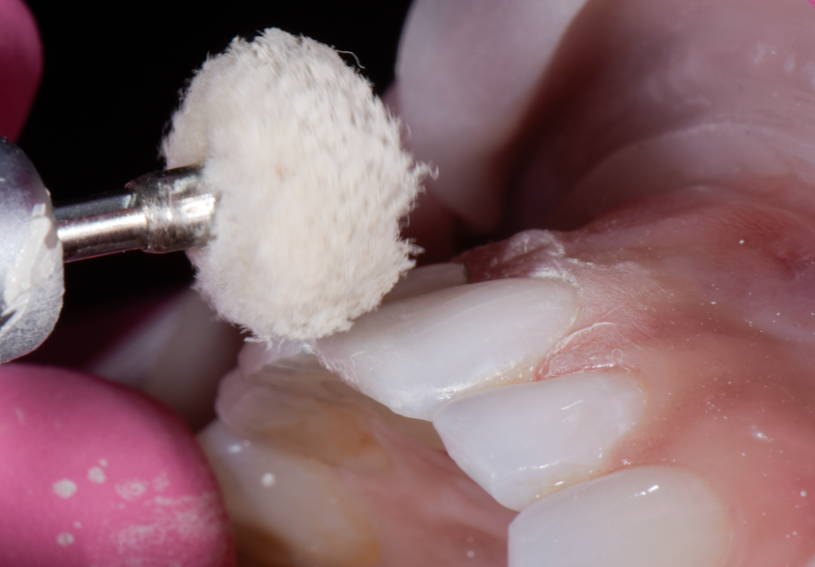
Cotton polisher polishing teeth

FIG. 14

In this case, the highest possible luster was required to match the surrounding dentition. A Final Shine Cotton Wheel (Clinician’s Choice) was used with a small amount of Enamelize polishing paste at low speed and low pressure to attain this.

Final smile result, no diastema in sight

FIG. 15

The resulting restorations on teeth #8 and 9 successfully reflected the patient’s esthetic expectations.

A complex treatment plan that encompasses multiple modalities can result in a lengthy treatment timeline. In this case, the long-term solution to the restoration of a worn anterior dentition to a more natural length and contour could only be addressed after an additional orthodontic phase. Even with a thorough  Understanding and agreement to the process, this young patient became unsure and disillusioned at a critical point in her treatment. Fortunately, after reviewing the progress that had been made, along with the trust that was built up to that point, restored the confidence to stay the course. It is, therefore, essential to continue to nurture the professional relationship that fosters cooperation and re-affirmation of the success of each step on the path that leads to the anticipated esthetic restorative result. (FIG.16)
Patient full face portrait showcasing final result

FIG. 16

The young patient was thrilled with her restorative results. While this case successfully met the expectations and goals of the treatment plan, it highlighted the need to maintain awareness of the patient’s motivation and participation as an integral contribution to achieving the clinical goal

About the Author

Dimple Desai, DDS, AAACD

Dr. Dimple Desai is the founder of Luminous Smiles of Newport Beach, a boutique dental practice focusing on rejuvenating patients’ lives through their smiles. She is one of the 350 Accredited Members of the American Academy of Cosmetic Dentistry in the world. Dr. Desai has been recognized locally as Orange County’s Top Dentist for the past four years and was selected as one of the Top 40 Dentists under the age of 40 in the country. Dr. Desai has been featured in various dental publications and continues to dedicate her passion to advancing her career in Dentistry. Dr. Desai is also a graduate of the Kois Institute and obtained both her Bachelor’s degree in Dental Hygiene and a Doctorate of Dental Surgery from the University of Southern California. She later returned to her Alma Mater as a Clinical Adjunct Professor to educate dental students on the clinic floor.

Discover More

This article was originally published in the Clinical Life™ magazine: Fall 2023 edition

Clinical Life™ magazine is a premier periodical publication by Clinical Research Dental Supplies & Services Inc. Discover compelling clinical cases from Canadian and US dental professionals, cutting-edge techniques, product insights, and continuing education events.

Subscribe to our emails to receive articles like this and be notified about our exclusive promotions.

Featured Products