A Conservative Approach to Restoring the Worn Anterior Dentition
Long-term restorative treatment of the worn dentition can be a complex endeavour and possibly extend beyond the scope and experience of the general dentist. Additionally, restoration of this compromised dentition may require other health disciplines’ involvement to address any psycho-social factors that may limit the long-term success of the restorative treatment. Therefore, before treating the worn dentition, there is a requirement of due diligence in thoroughly investigating its etiology and overall effect on occlusal function and tooth structure through a rigorous clinical examination, medical and social history, and careful assessment of mounted study models.
Traditionally, the treatment plan is developed using the information from these articulated models in addition to the clinical findings. However, the need for a restorative wax-up and a means of transferring that information to the operatory setting may be replaced by an intraoral mock-up by adding composite to the worn anterior teeth. Once the desired tooth form and occlusion are achieved, a lingual matrix is quickly fabricated chairside to transfer this information into the final restoration. This composite mock-up will also serve as a shade selection for the various composite layers, providing the optimal location and thickness of the incisal
edges, establishing lingual contours incisal embrasures, and point angles of the new restorations. This restorative guide, constructed in real-time using the patient’s envelope of function, will significantly reduce placement and finishing time while providing a more predictable, long-term restorative result.
A 28-year-old male presented with a worn maxillary anterior dentition from canine to canine. (FIG 1)
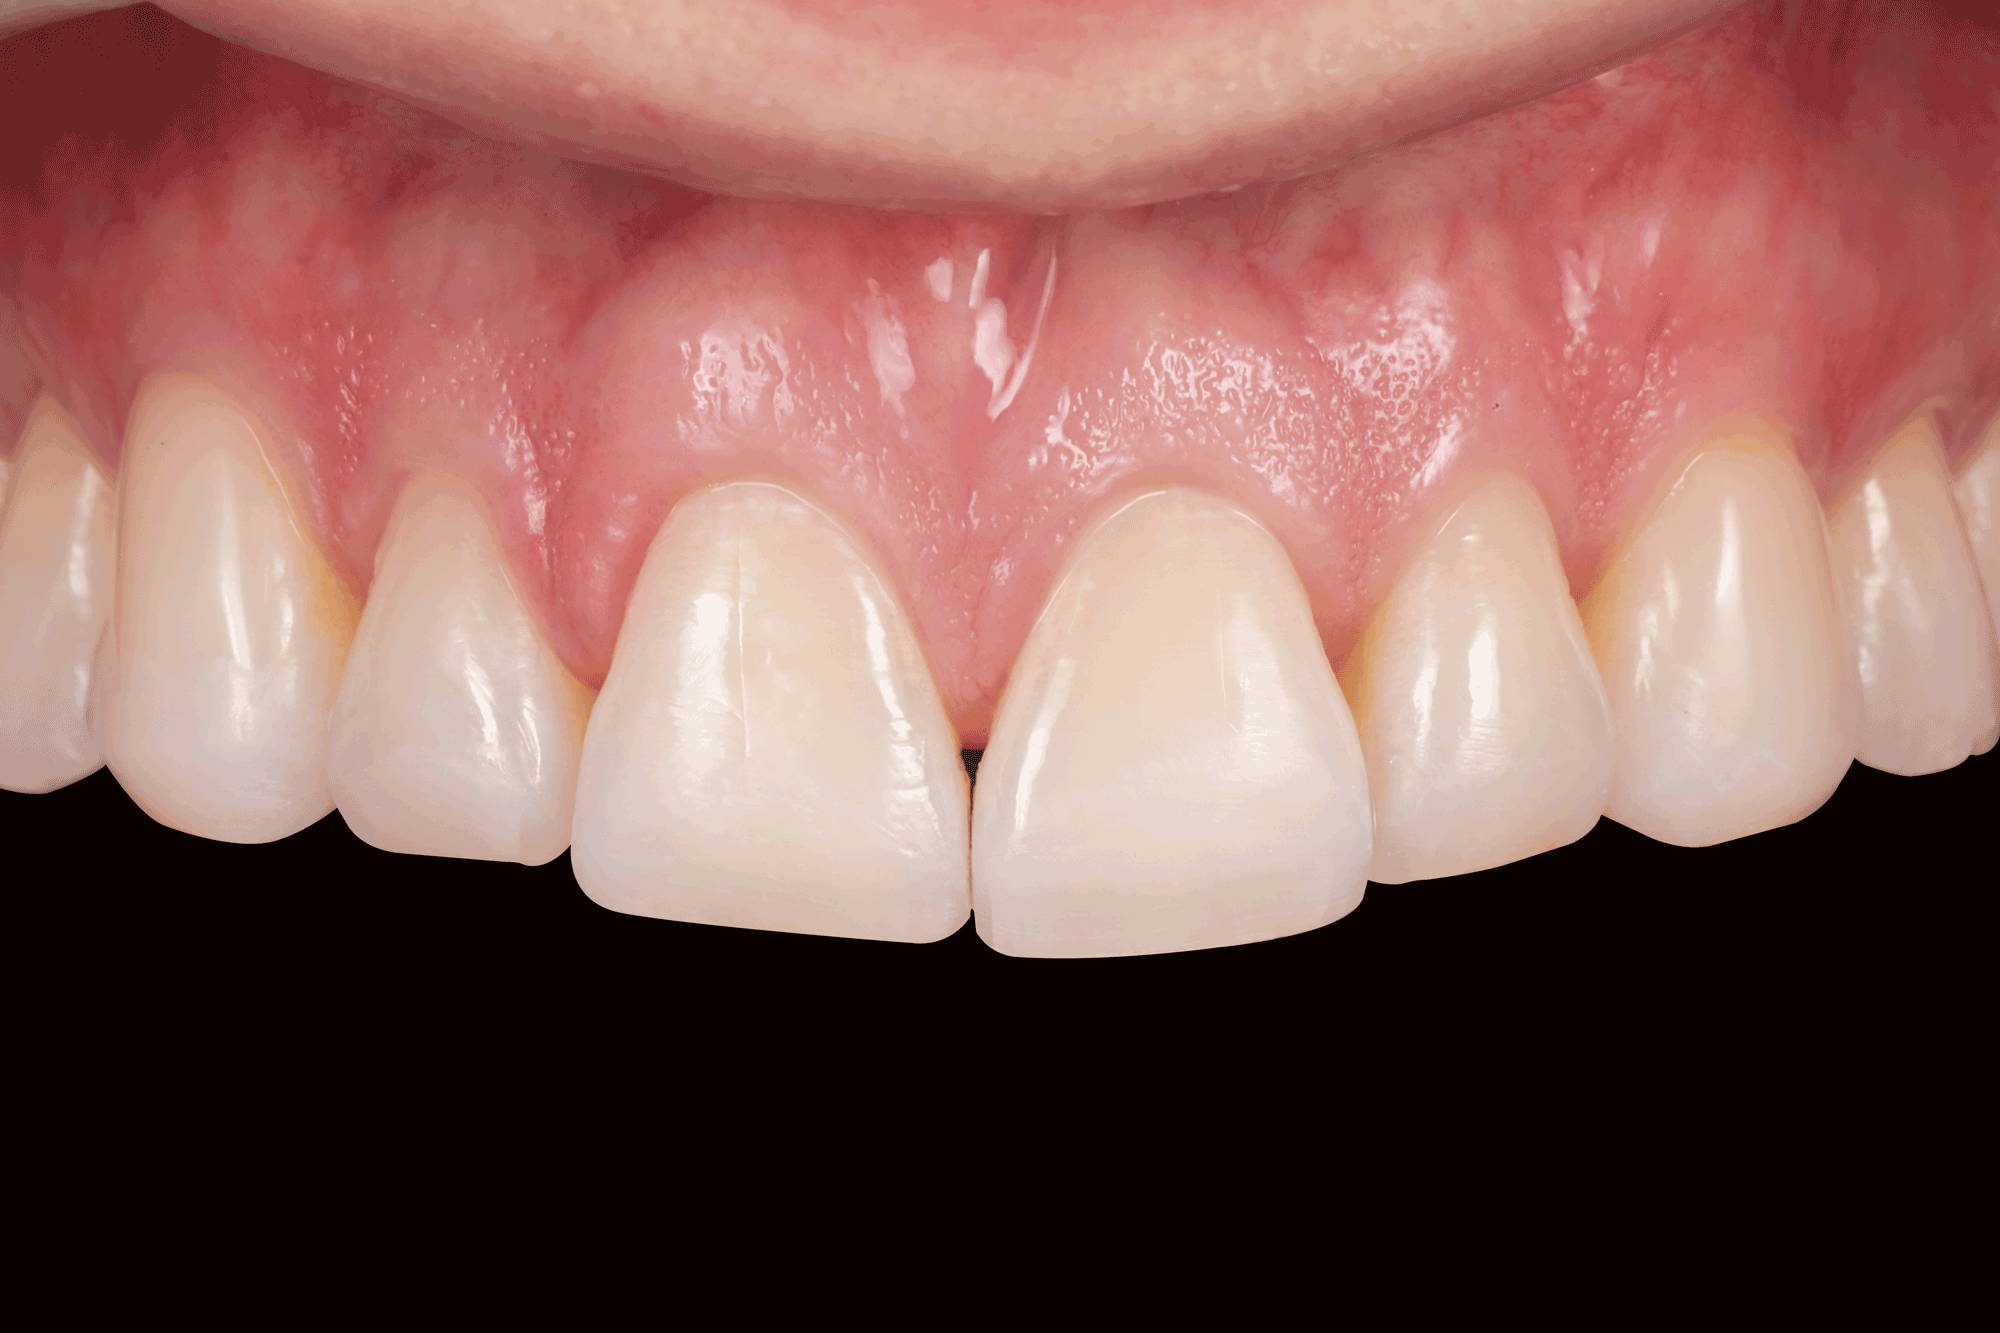
FIG. 1
28-year-old male presented with moderate maxillary anterior wear consistent with anterior bruxism. Canine guidance was also lost as a consequence
"This restorative guide, constructed in real-time using the patient’s envelope of function, will significantly reduce placement and finishing time while providing a more predictable, long-term restorative result.”
He freely admitted to a stressful lifestyle and was diagnosed with bruxism limited to the anterior teeth only. There was no clinical wear observed on the posterior teeth. Unfortunately, this young man was a habitual fingernail biter. The treatment plan proposed was to conservatively restore the four maxillary incisors and canines to their natural length and contour, thus re-establishing the protective canine-guided occlusion. In addition to recommending assistance with his stressful lifestyle,
the patient had to firmly acknowledge that the long-term success of the restoration of his anterior tooth wear was contingent on the complete cessation of his fingernail-biting habit.
The treatment plan called for a single restorative appointment. The intraoral composite mock-up was accomplished using Evanesce A2D and Evanesce FX non-
VITA shade ENI (Clinician’s Choice). (FIG 2)
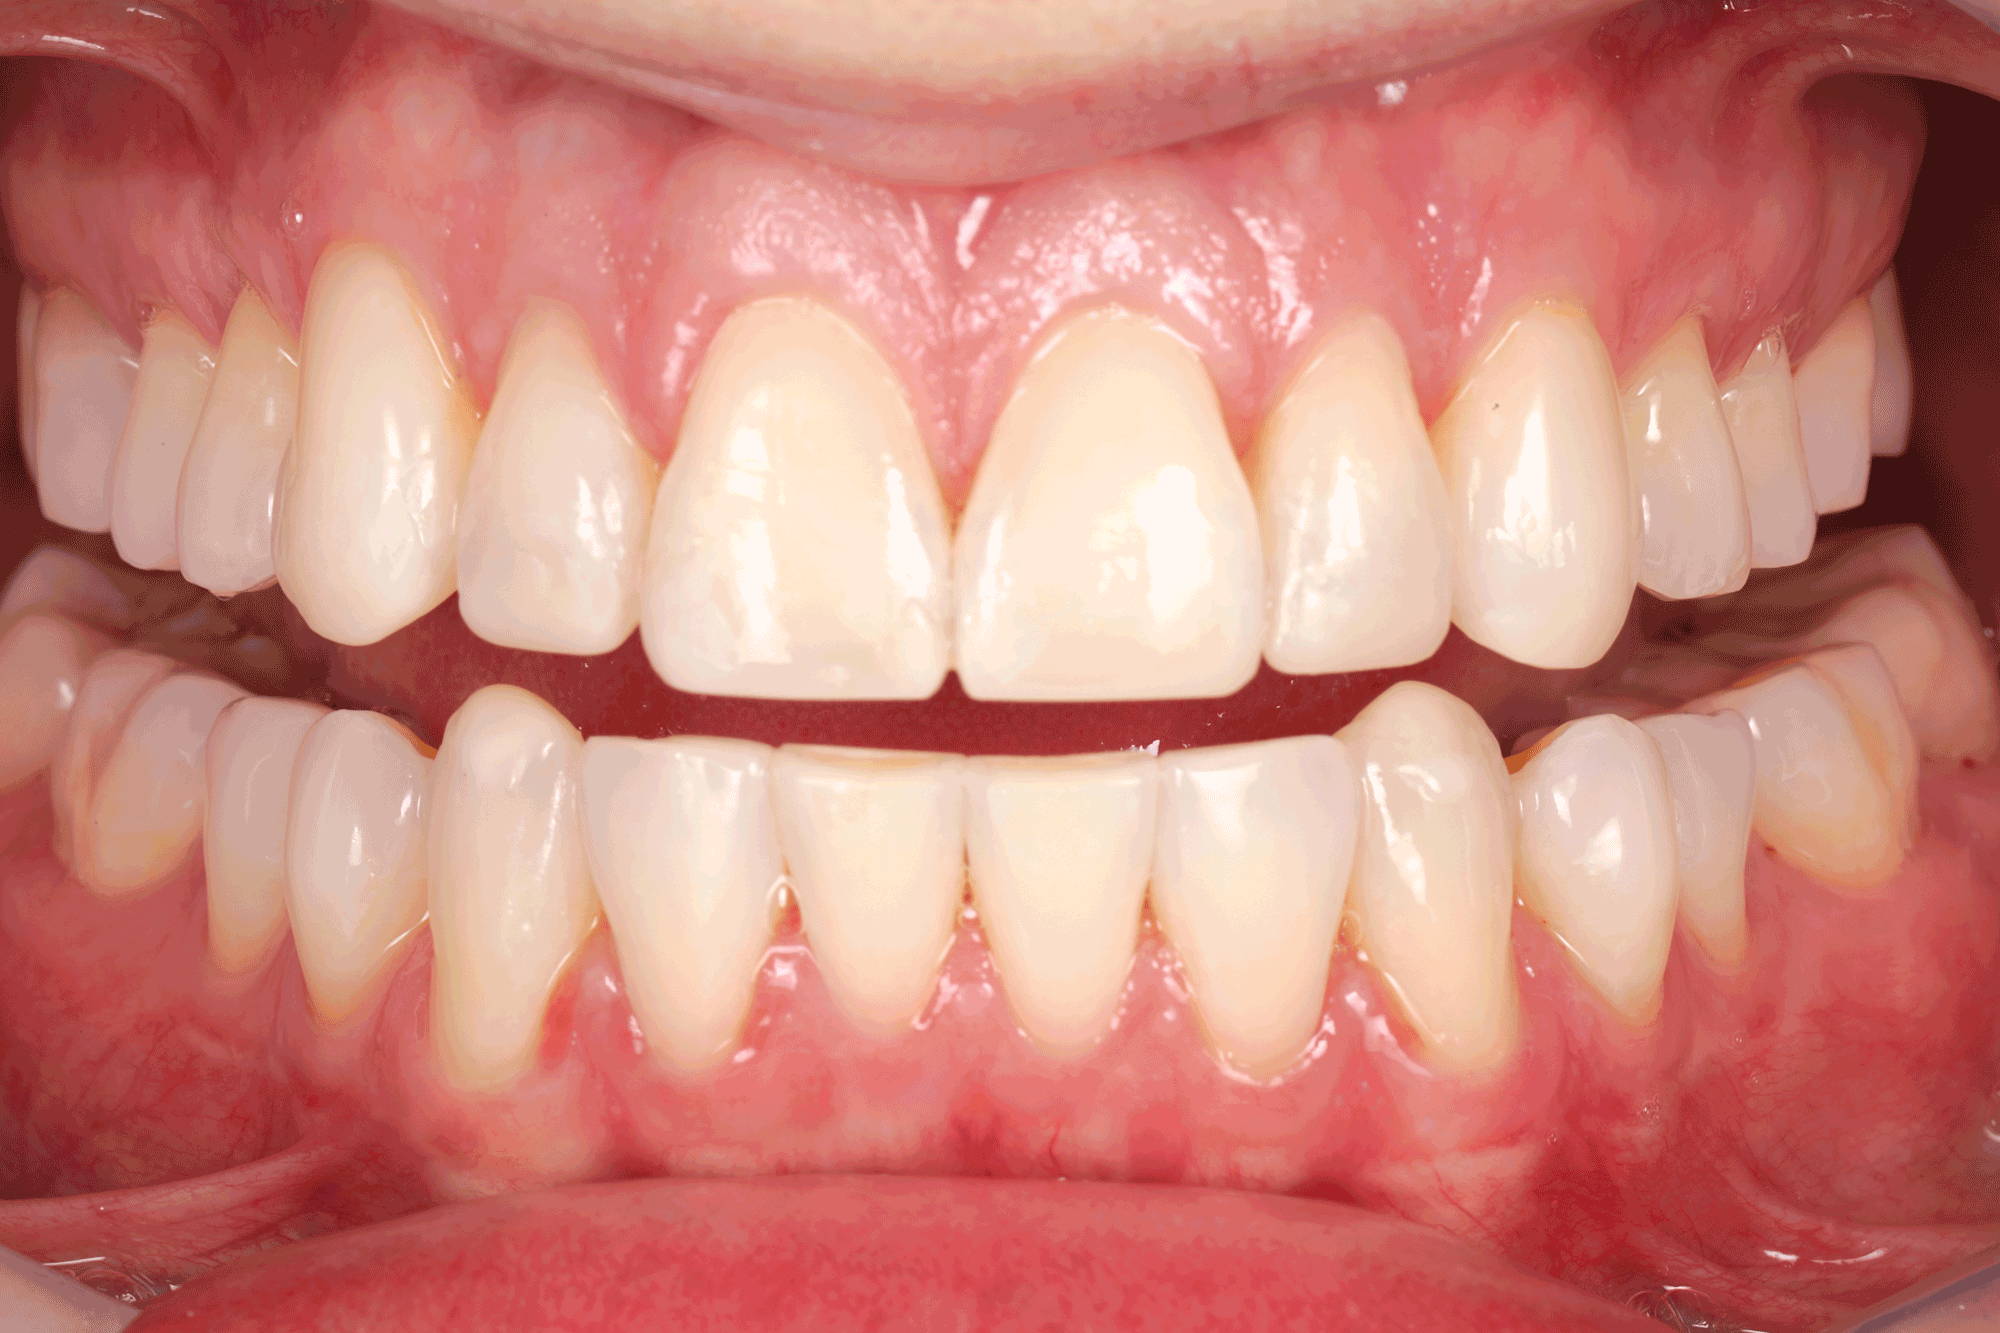
FIG. 2
Intraoral mock-up of maxillary incisors and maxillary and mandibular canines. Using the patient’s actual envelope of motion was beneficial in creating the optimal incisal edge thickness and location, lingual contours and incisal embrasures, as well as enabling final shade selection.
Evanesce was selected as the restorative composite for its nano-hybrid properties; high flexural strength vital to this application; its handling characteristics and Evanesce’s ability to blend in seamlessly into the surrounding tooth structure.
Once completed, a lingual matrix was fabricated using Template Ultra Quick Matrix Material (Clinician’s Choice) (FIG 3) and trimmed not to extend beyond the facio-incisal line angle. The lingual matrix is integral to transferring the lingual contours, incisal edge thickness and location as well as the incisal embrasure established in the mock-up to the final restoration.

FIG. 3
A lingual matrix was fabricated from the intraoral composite mock-up in under one minute using Template Ultra Quick Matrix Material (Clinician’s Choice).
The unbonded composite mock-up was easily removed from the teeth as the lingual matrix was tried in for fit and accuracy. (FIG 4) Preparation of the worn teeth consisted in the placement of a strong facial bevel of 2mm and a lesser lingual bevel of 1.5mm using the K0358 Fahl Composite System (Brasseler). This was followed by particle air abrading the enamel surface with 27μ Al2O3 using a Microetcher (Danville) to remove the aprismatic enamel for bond enhancement. (FIG 5)
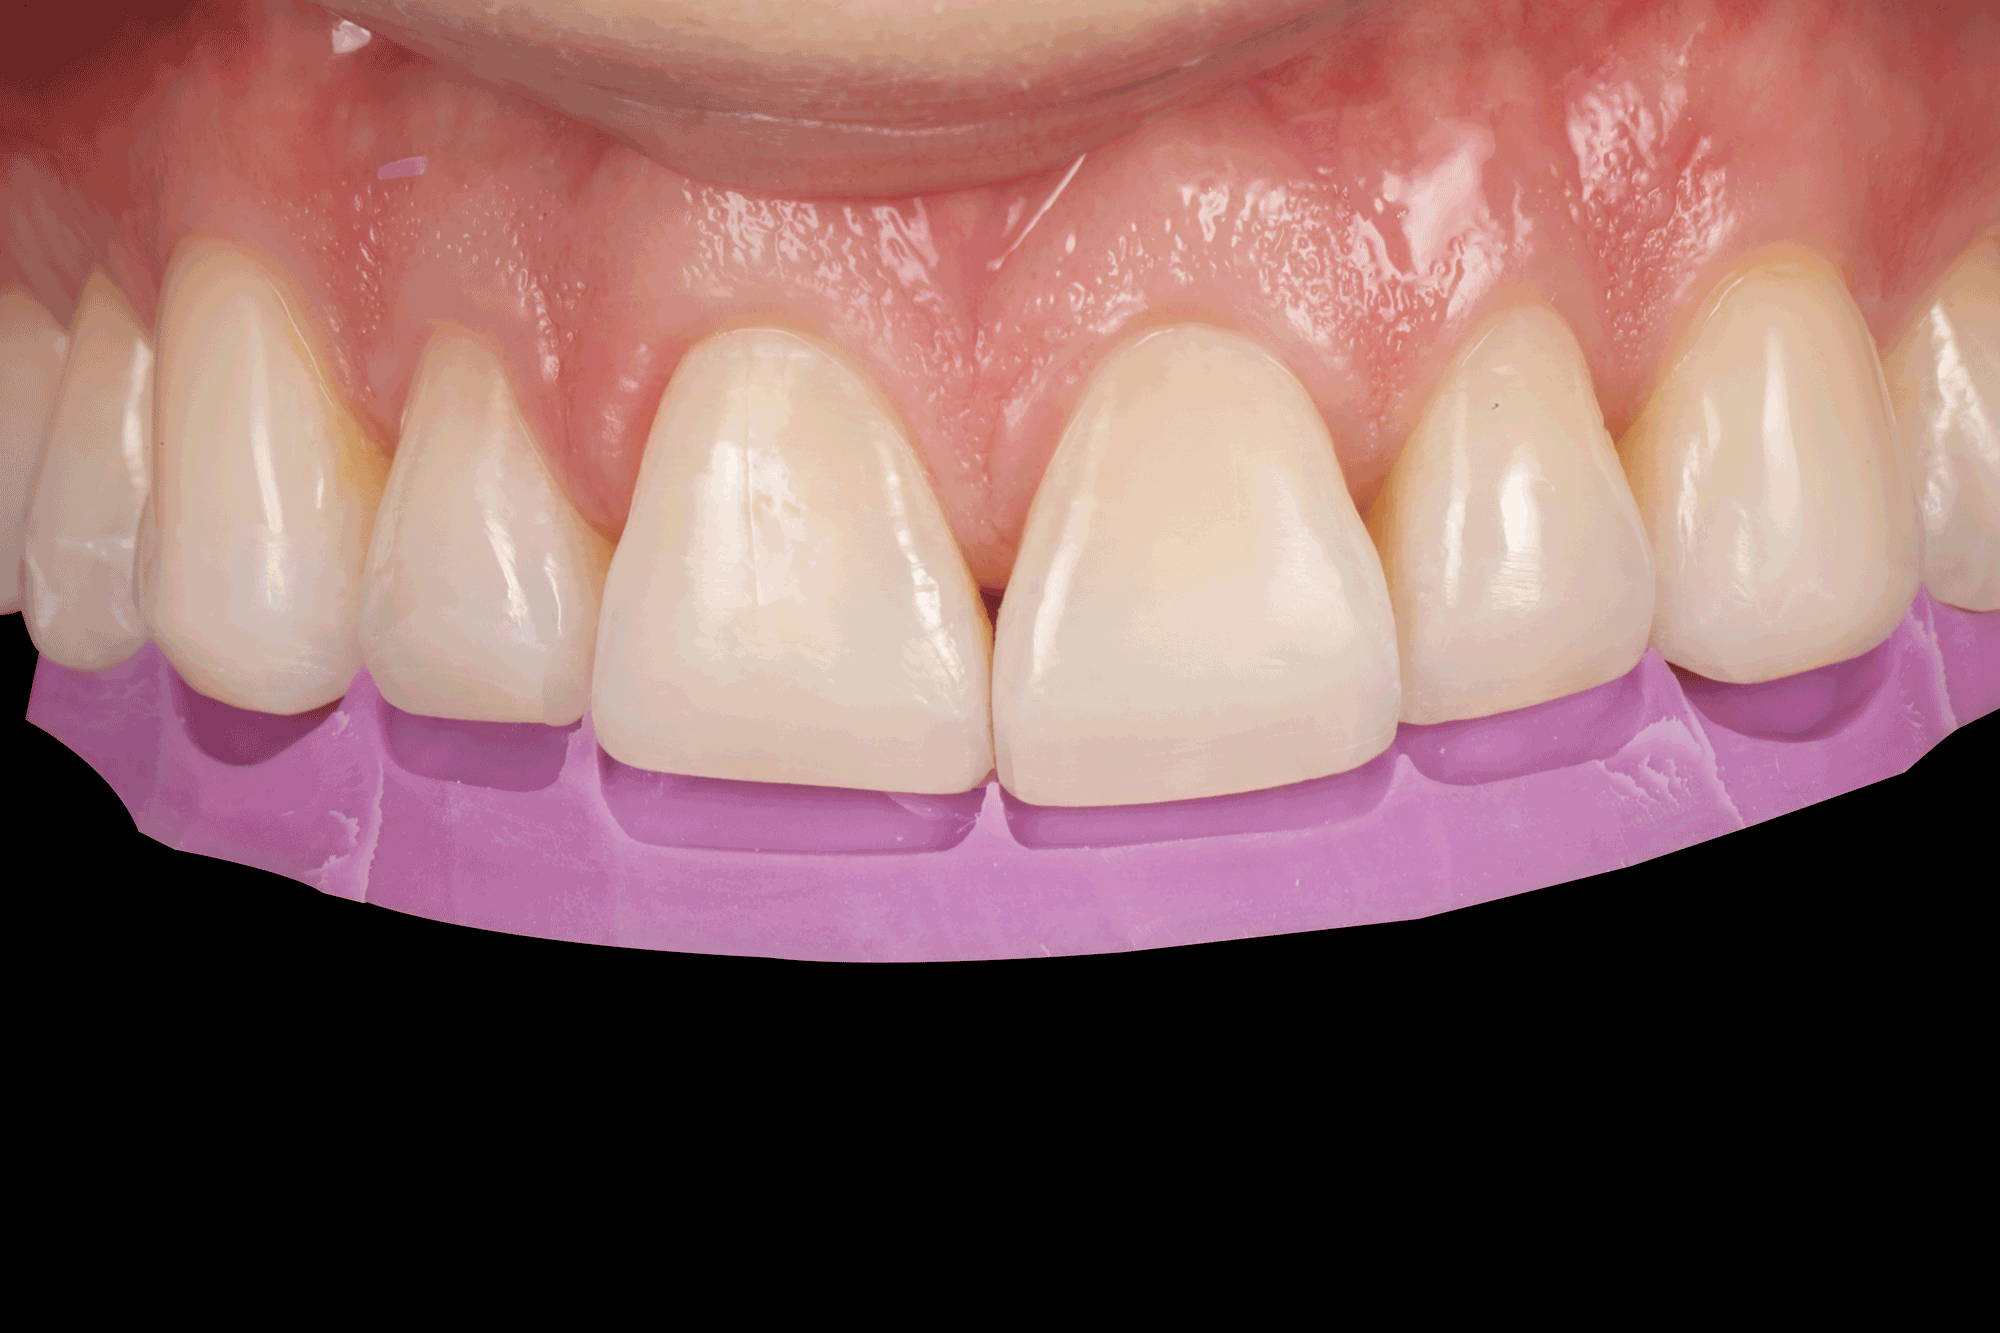
FIG. 4
The facial aspect of the lingual matrix is trimmed up to, but not beyond, the inciso-facial line angle. It is then replaced on the teeth and assessed for accuracy of fit.

FIG. 5
Bonding is enhanced through the removal of aprismatic enamel using air abrasion.
All anterior maxillary teeth were isolated using a length of dead soft metal matrix, and phosphoric acid was placed up to the middle 1/3 of all teeth simultaneously. (FIG 6) After vigorously rinsing off the acid and controlling the moisture level of the enamel and exposed dentin, Optibond Fl adhesive (Kerr) was applied to the etched surfaces (FIG 7), per the manufacturer’s recommendation, and light-cured.
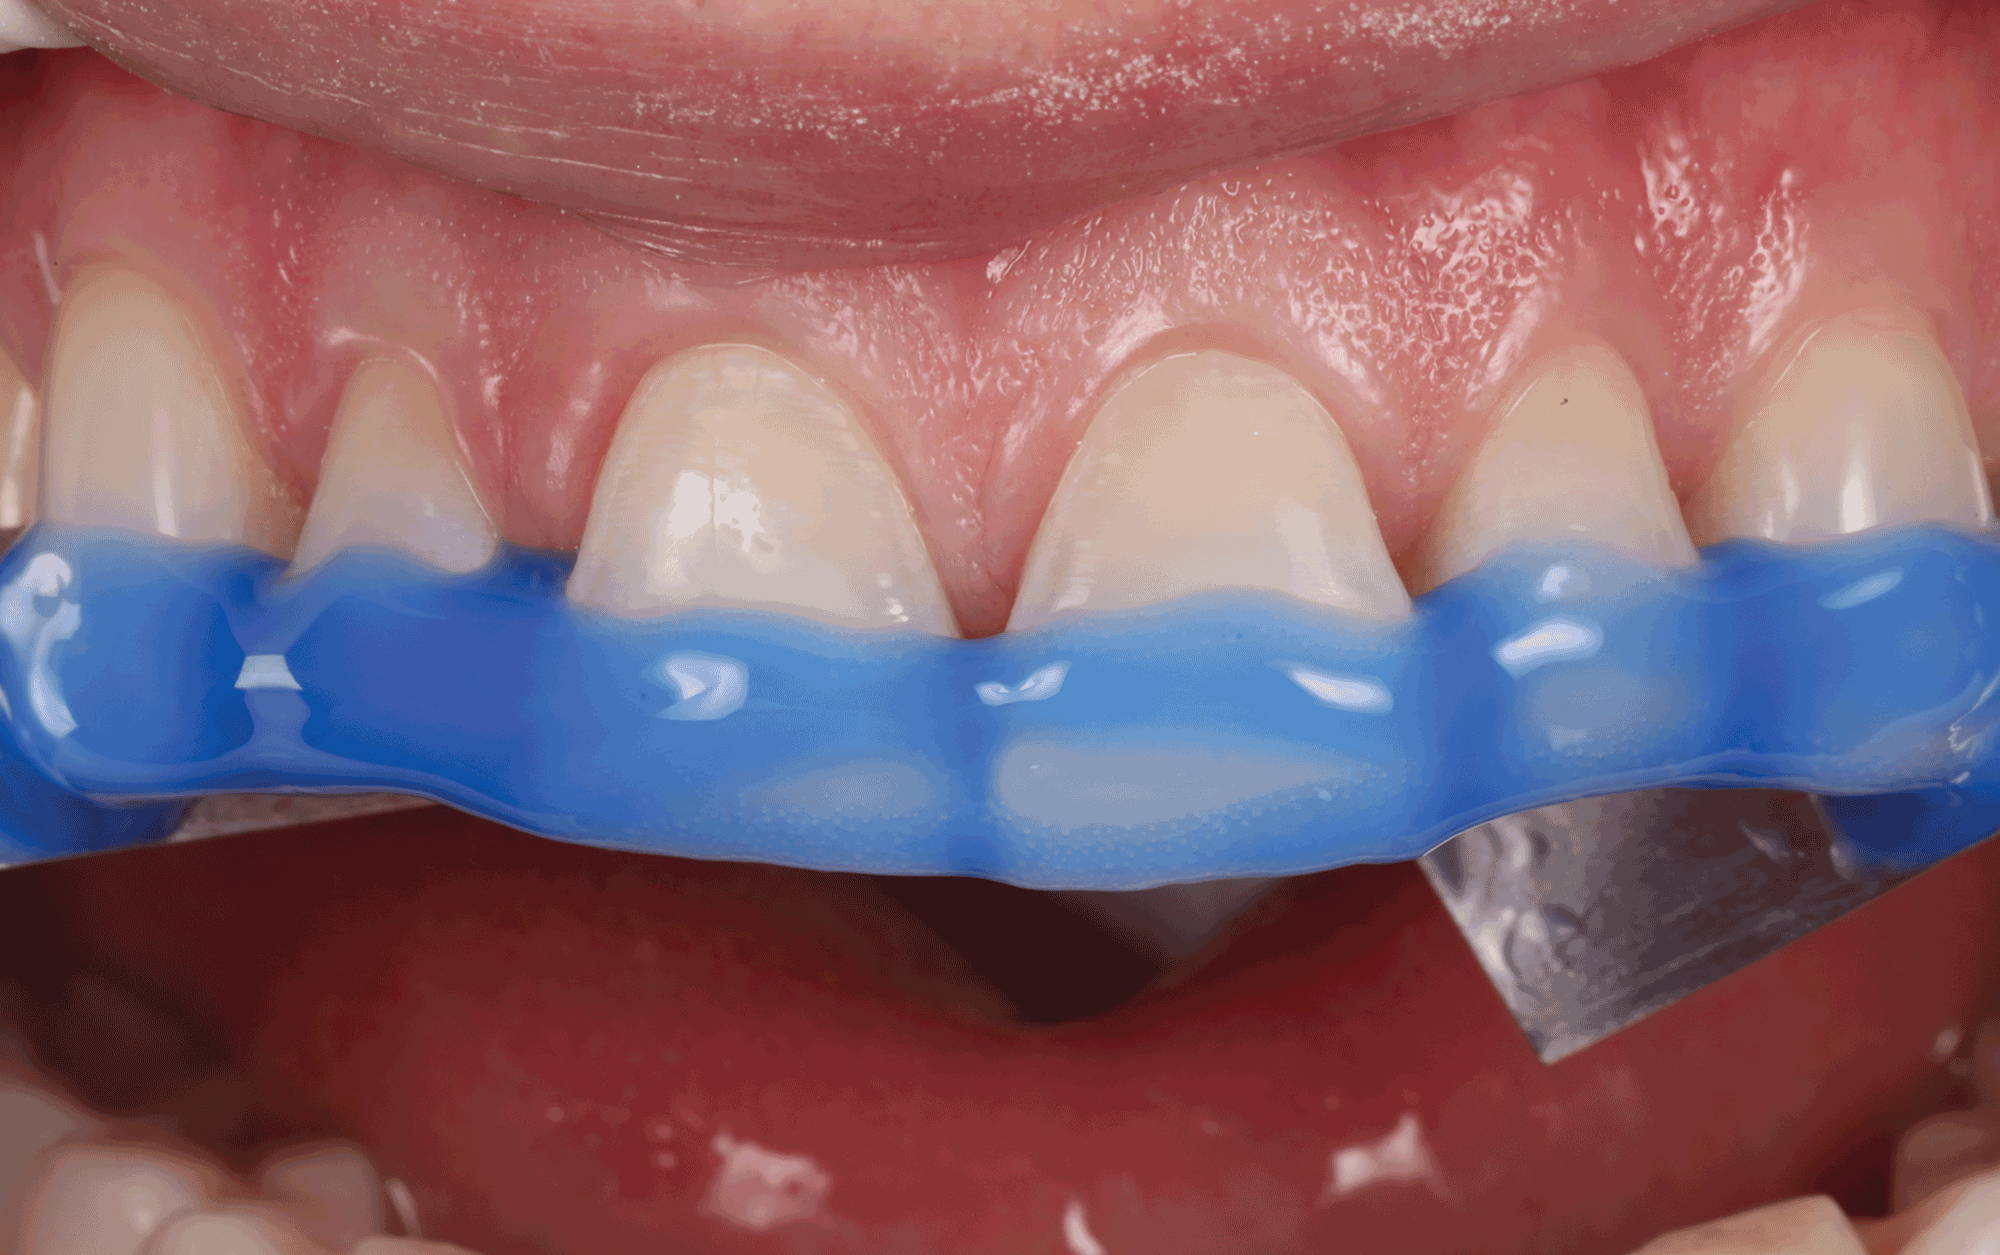
FIG. 6
Phosphoric acid is simultaneously applied well beyond the beveled margin, covering roughly 1/3 of the tooth.
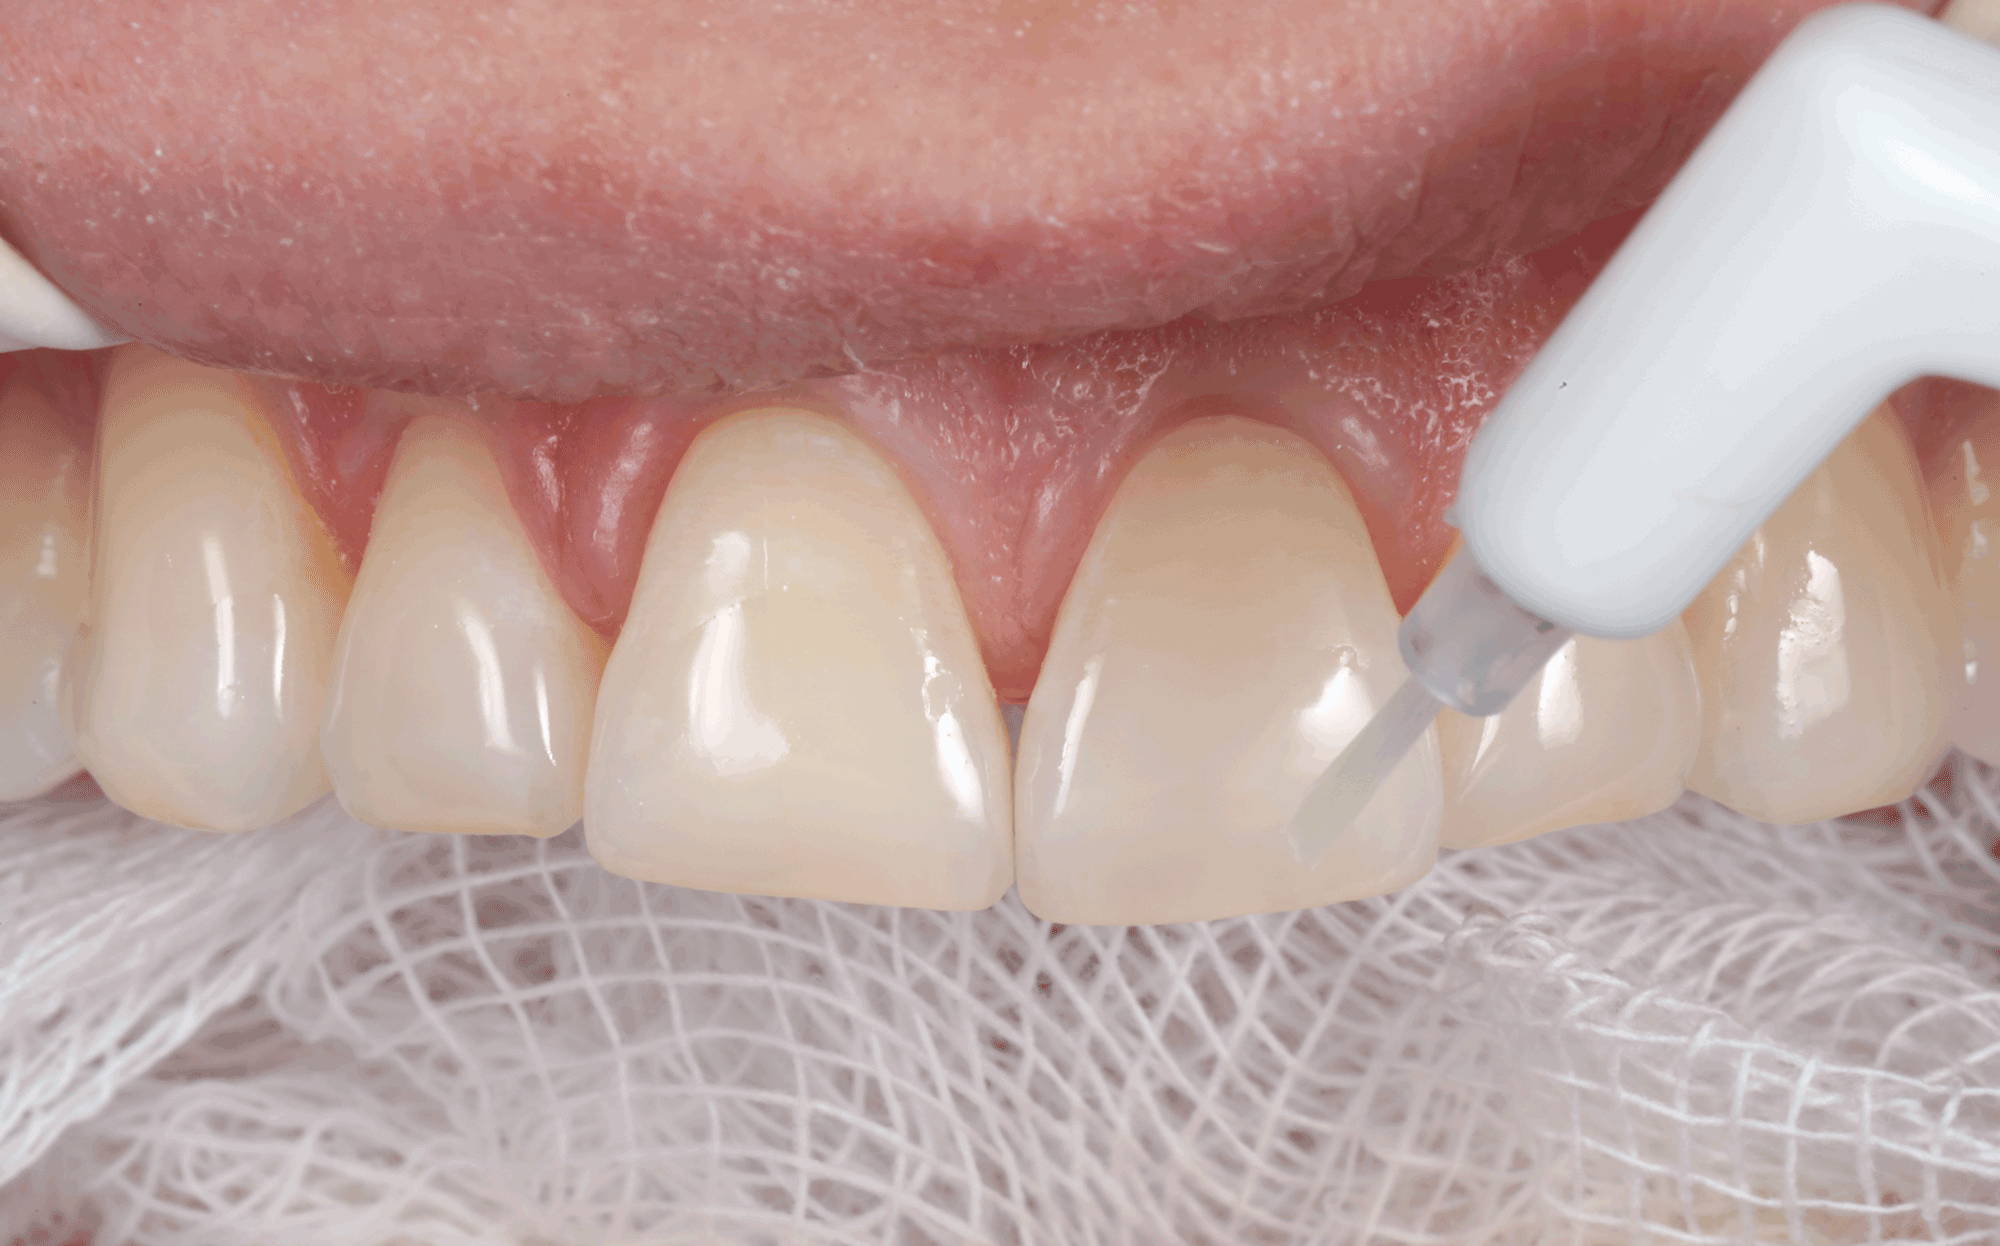
FIG. 7
Adhesive is applied onto and beyond the etched enamel on all the prepared teeth at once, followed by air-thinning/drying and light-curing.
A line scribed onto the interior of the lingual matrix corresponding to the worn incisal edge provides a guide to the placement of an even layer of 2/3 of a mm of Evanesce A2D after which the lingual matrix is re-seated and the lingual shell is adapted to the prepared teeth and light-cured. (FIG 8)
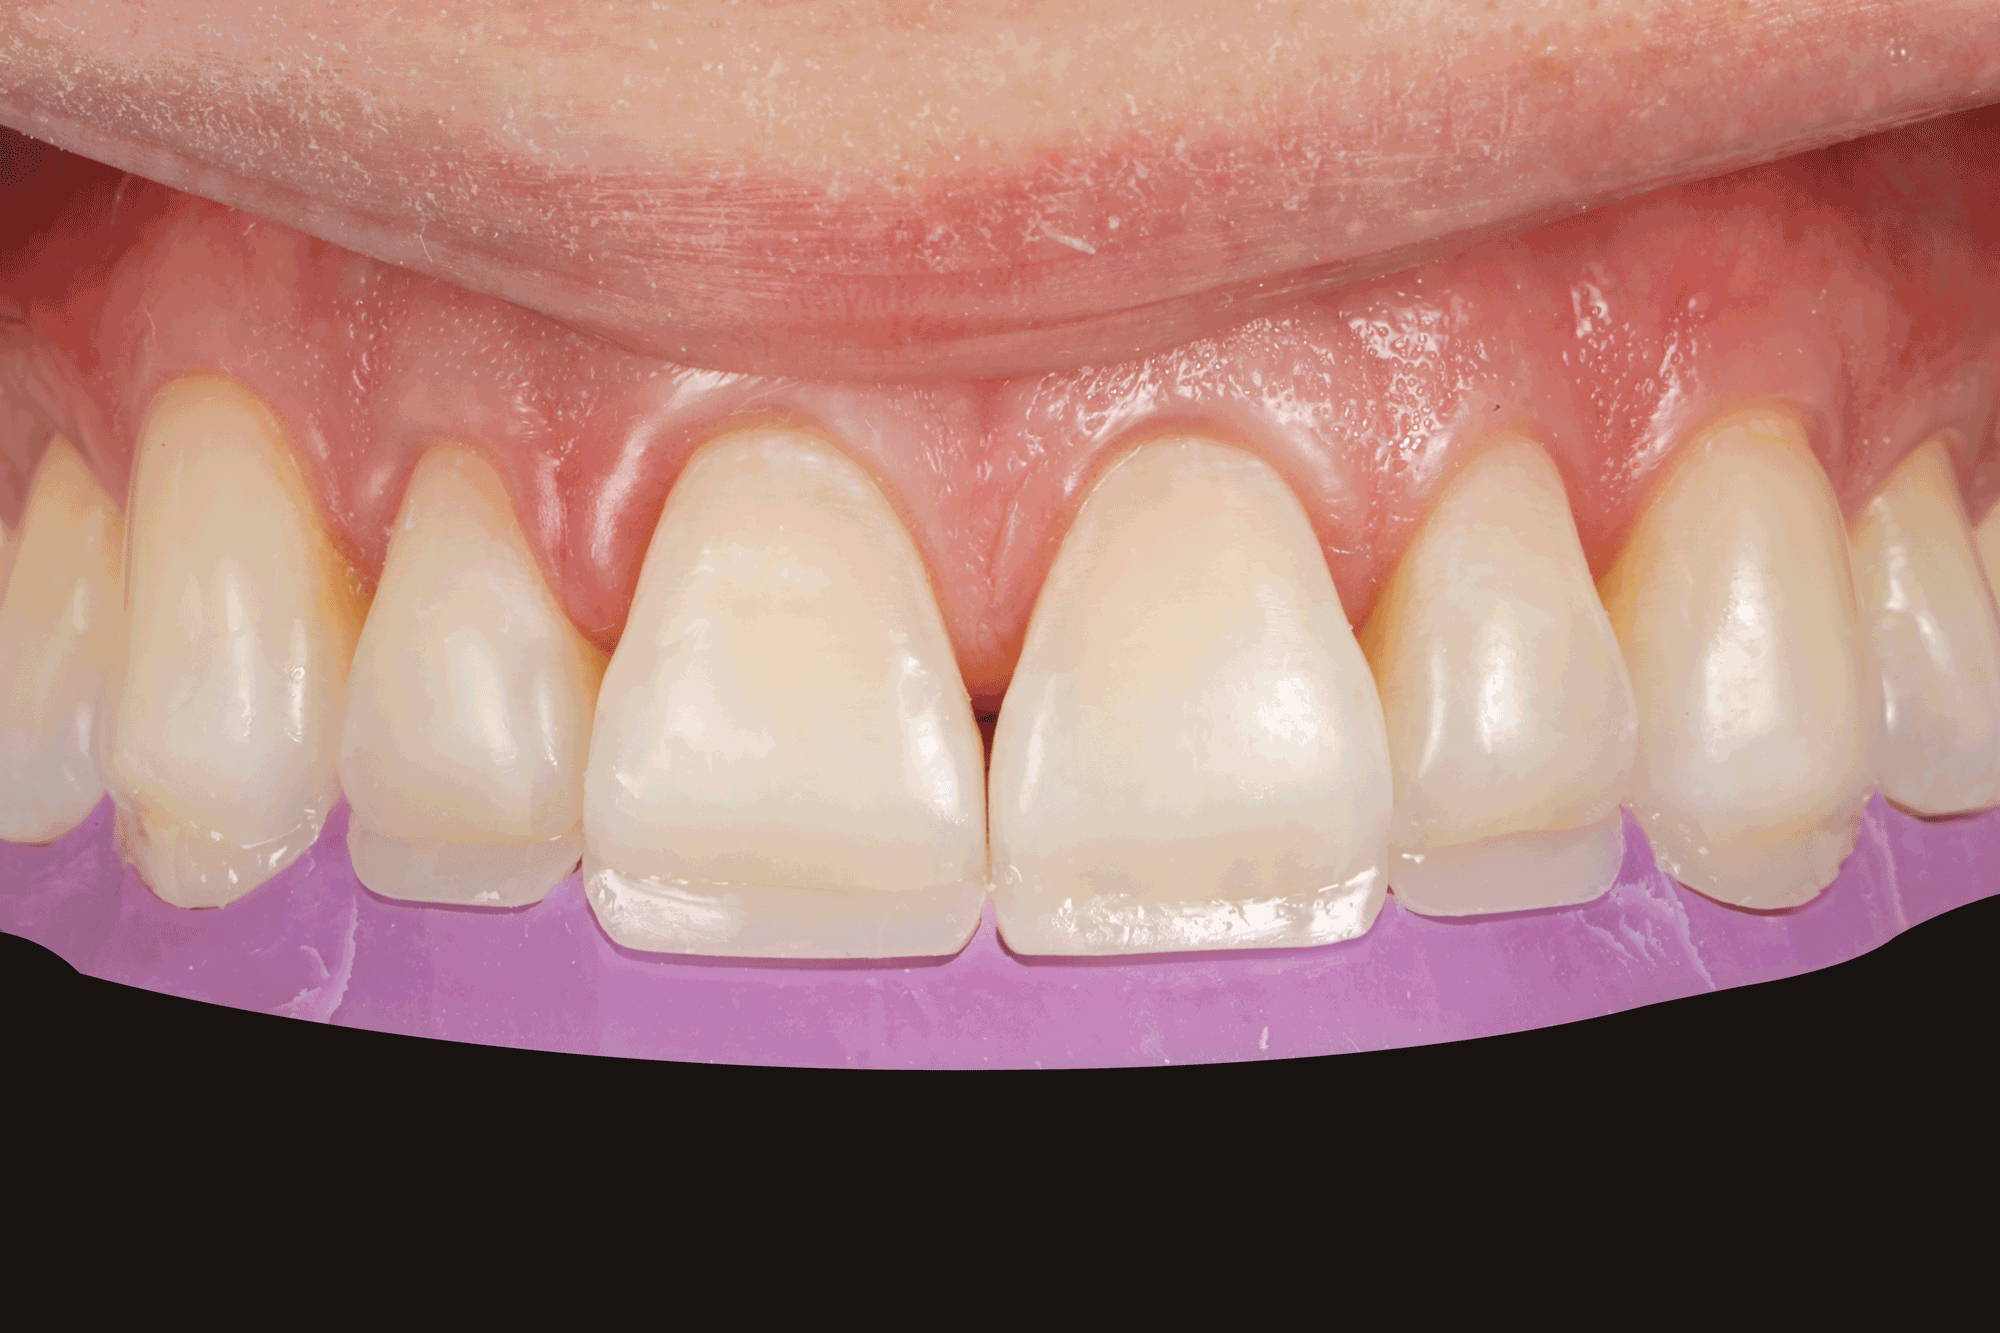
FIG. 8
The lingual shell is created by placing a thin layer of the A2D composite into the incisal aspect of the lingual matrix. It is helpful to scribe a line into the matrix at the level of the worn incisal edge in order to guide your placement of the composite. The lingual matrix is then re-fitted to the teeth and the lingual shell is adapted to the prepared teeth and light-cured in place.
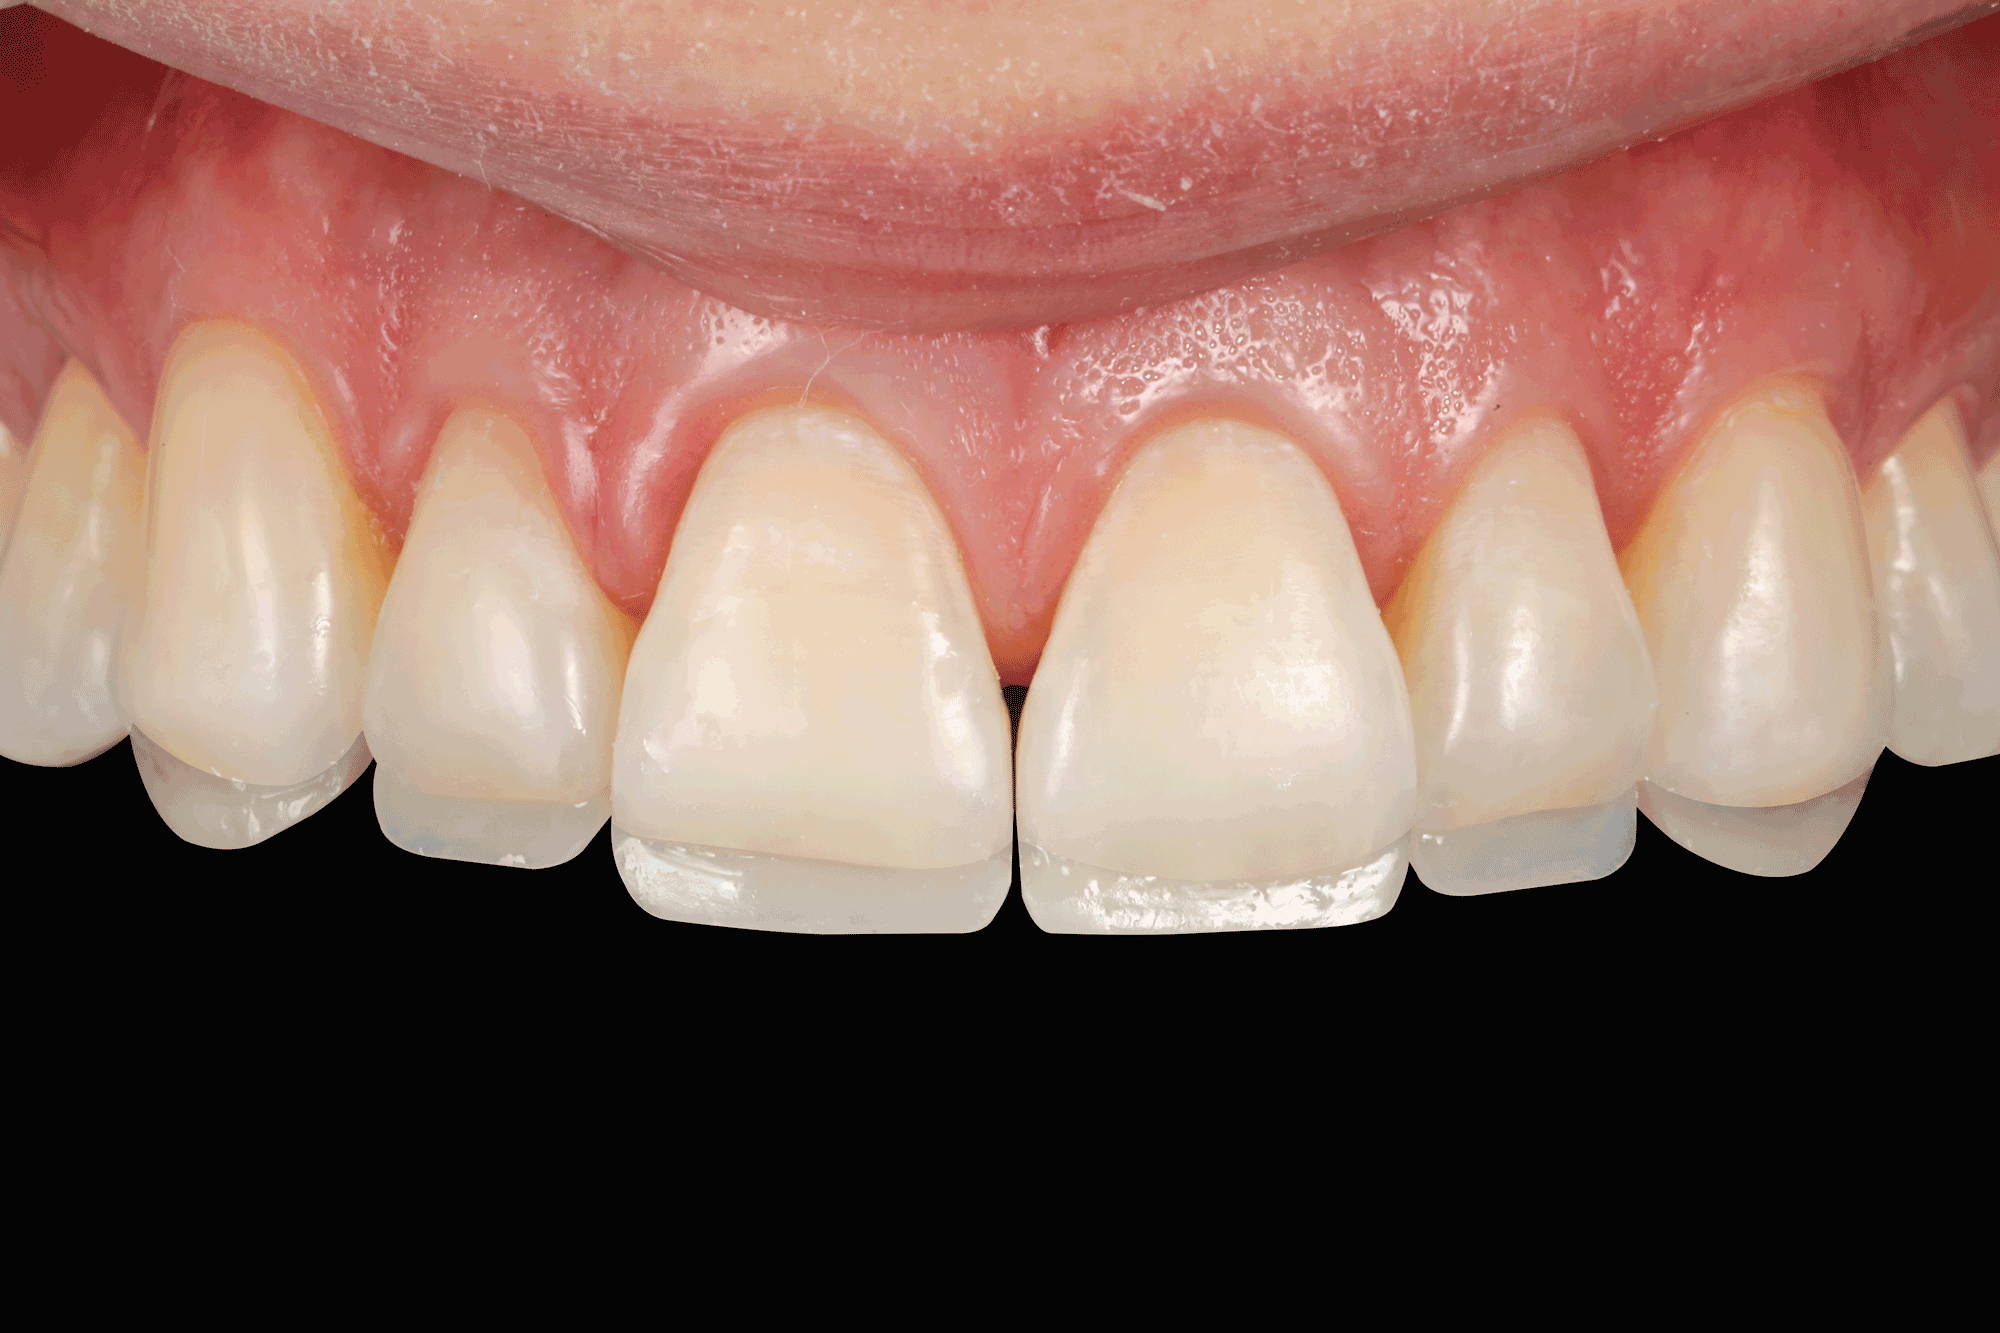
FIG. 9
The lingual shell should be as thin as possible in order to allow room for the subsequent layers.
It is critical that this lingual shell of composite be of a homogeneous thickness all throughout to allow for a controlled and effective layering of the subsequent composite layers. (FIG 9)
The next layer of Evanesce A2D is carefully placed into the lingual shell. This layer is intended to create a more opacious layer that will blend smoothly into the surrounding tooth structure. Areas of relief within this layer, incisally and proximally (FIG 10), are left to provide room for the placement of the more translucent Evanesce ENI layer to impart a natural enamel depth and halo effect, and this layer is light-cured. The application of this A2D composite layer is accomplished simultaneously on all prepared teeth to better control thickness and contours. Evanesce ENI is now placed to the full facial contour with a slight excess left for
finishing. (FIG 11)
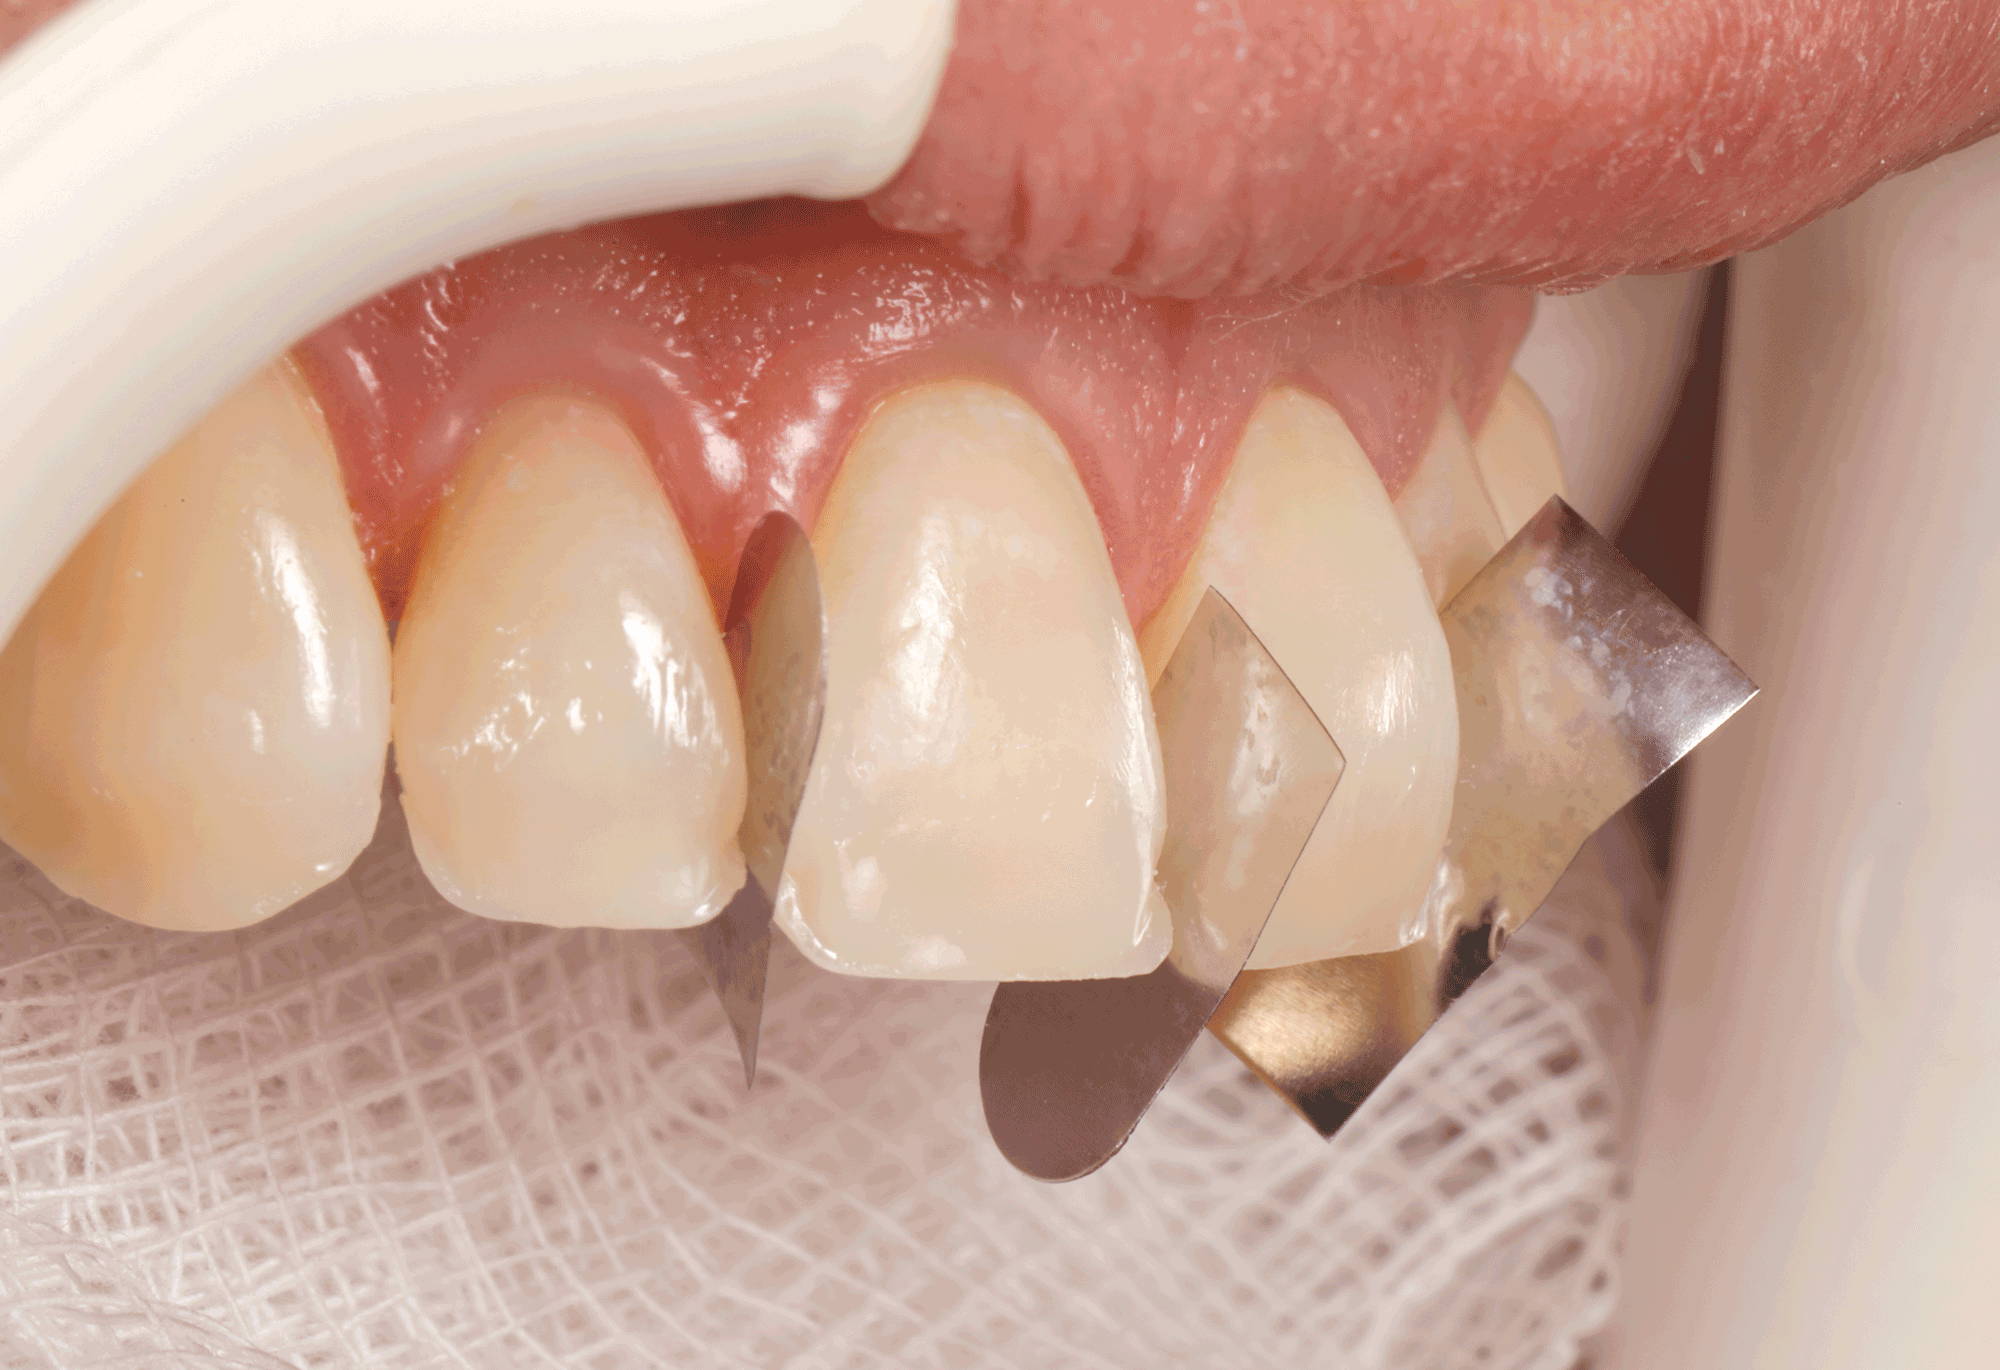
FIG. 10
The next layer of A2D is placed within the lingual shell and blended into the surrounding tooth structure, leaving areas of relief proximally and incisally for the more translucent final layer of ENI.

FIG. 11
Application of the final layer of the more translucent Evanesce ENI into the recessed areas of the A2D.
Blending of both the A2D to the surrounding tooth structure and the ENI to the A2D layer is nicely facilitated with a #3 composite brush (Cosmedent) and Wetting Resin (Ultradent). (FIG 12)
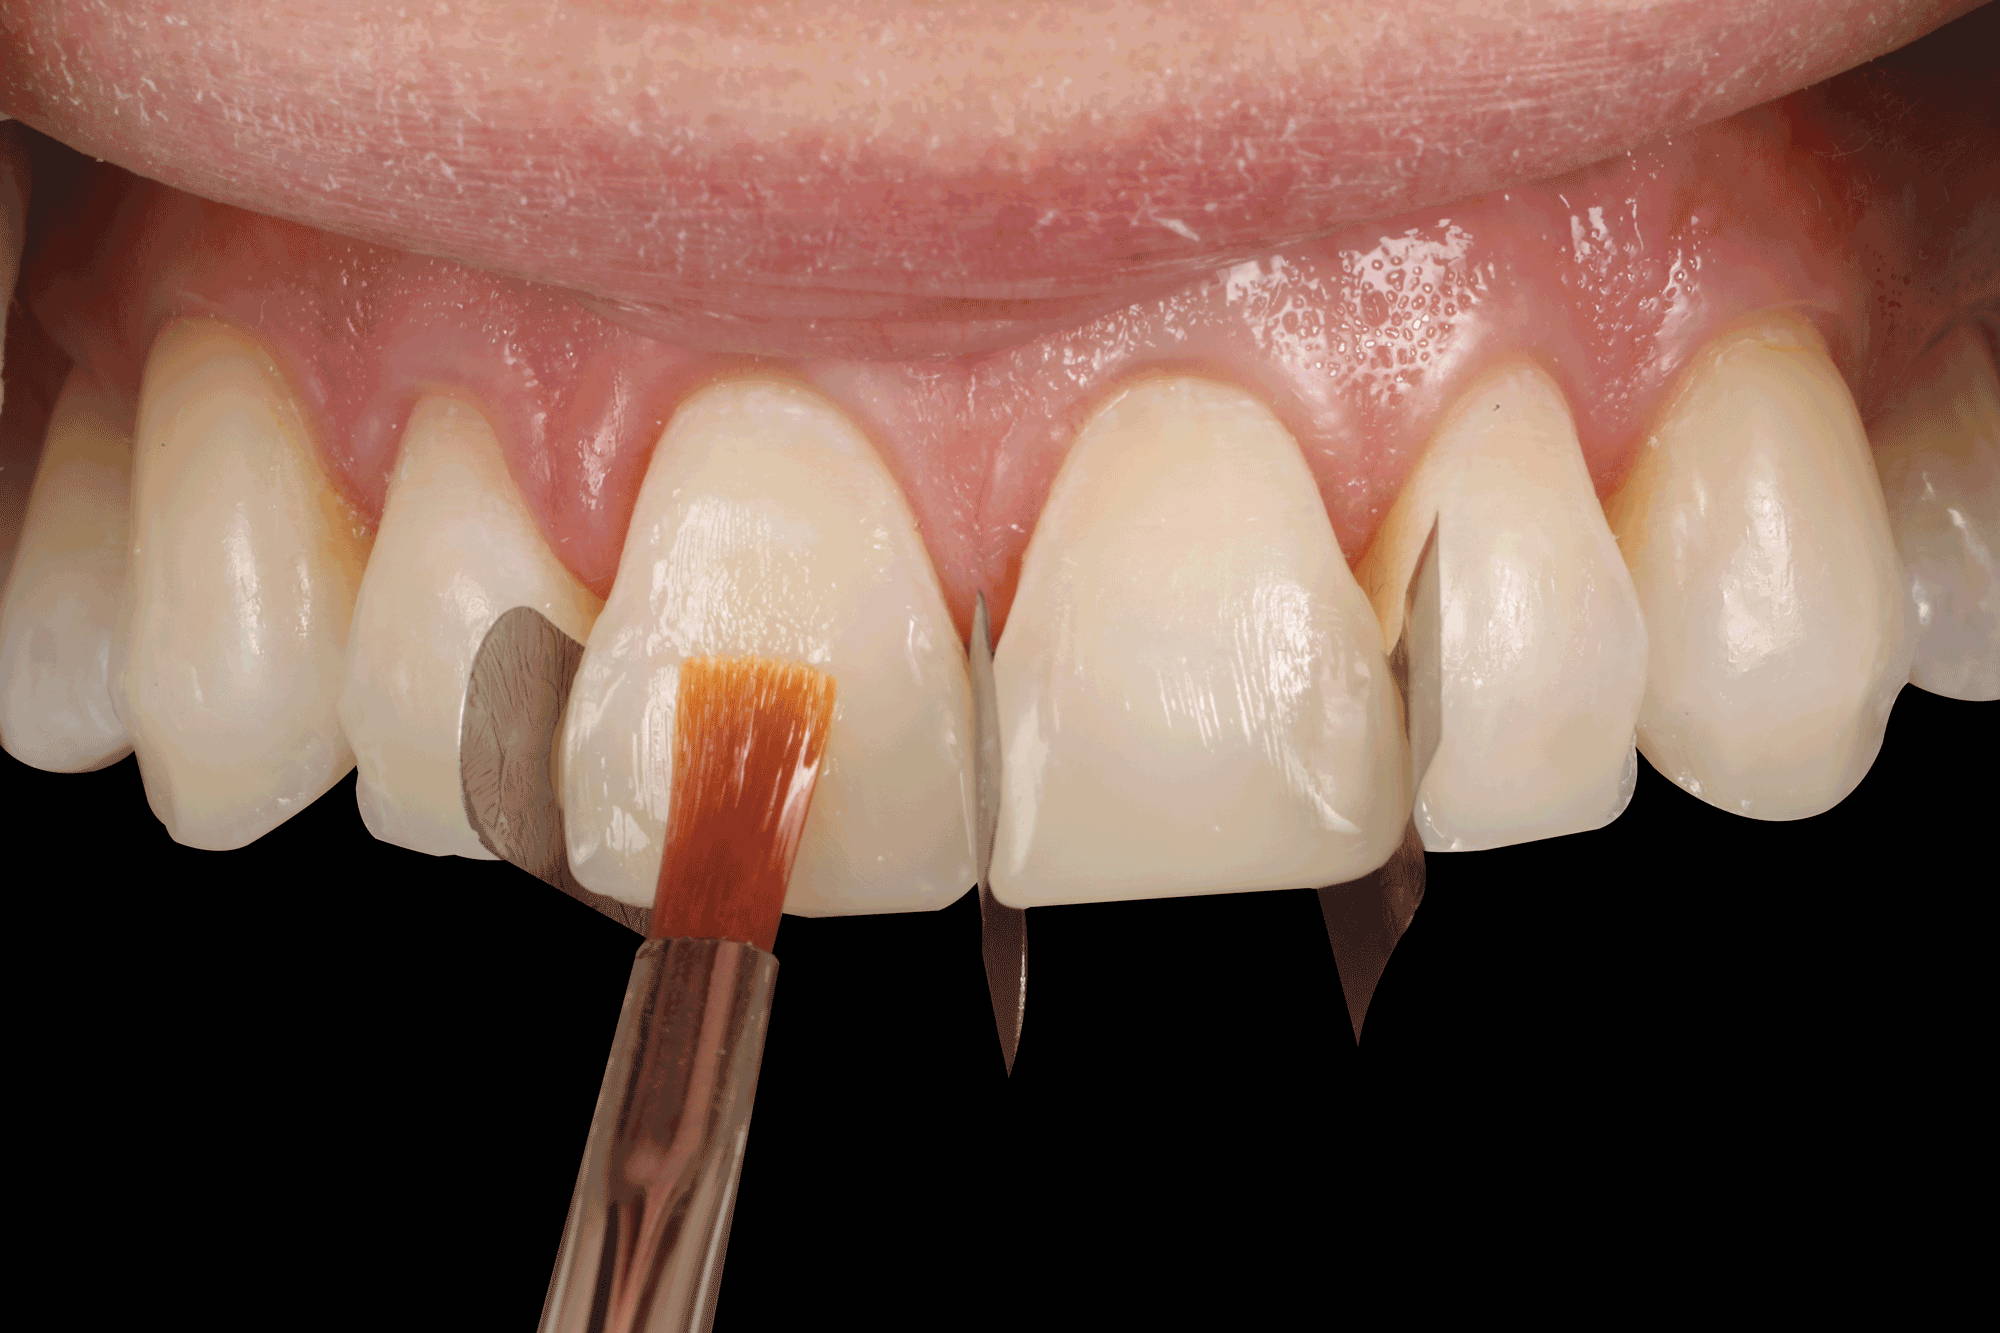
FIG. 12
Spreading and blending of composite to a previous layer and surrounding tooth structure is greatly aided by the use of a small amount of a modelling resin on a #3 composite brush.
The patient’s natural dentition lacked any secondary or tertiary anatomy so no texturing of the facial surface was necessary. Finishing of the restorations consisted of the sequential use of Contours Finishing and Polishing Discs (Clinician’s Choice). (FIG 13) This allowed the immediate use of the A.S.A.P. All Surface Access Polishers (Clinician’s Choice). (FIG 14) This one-shape, 2-step diamond polishing system quickly brings out the high luster of the composite. The combination of
the Evanesce nano-hybrid composite, A.S.A.P. Polishers and a smooth tooth surface texture eliminated the need to go further in the polishing sequence with a polishing paste. (FIG 15)
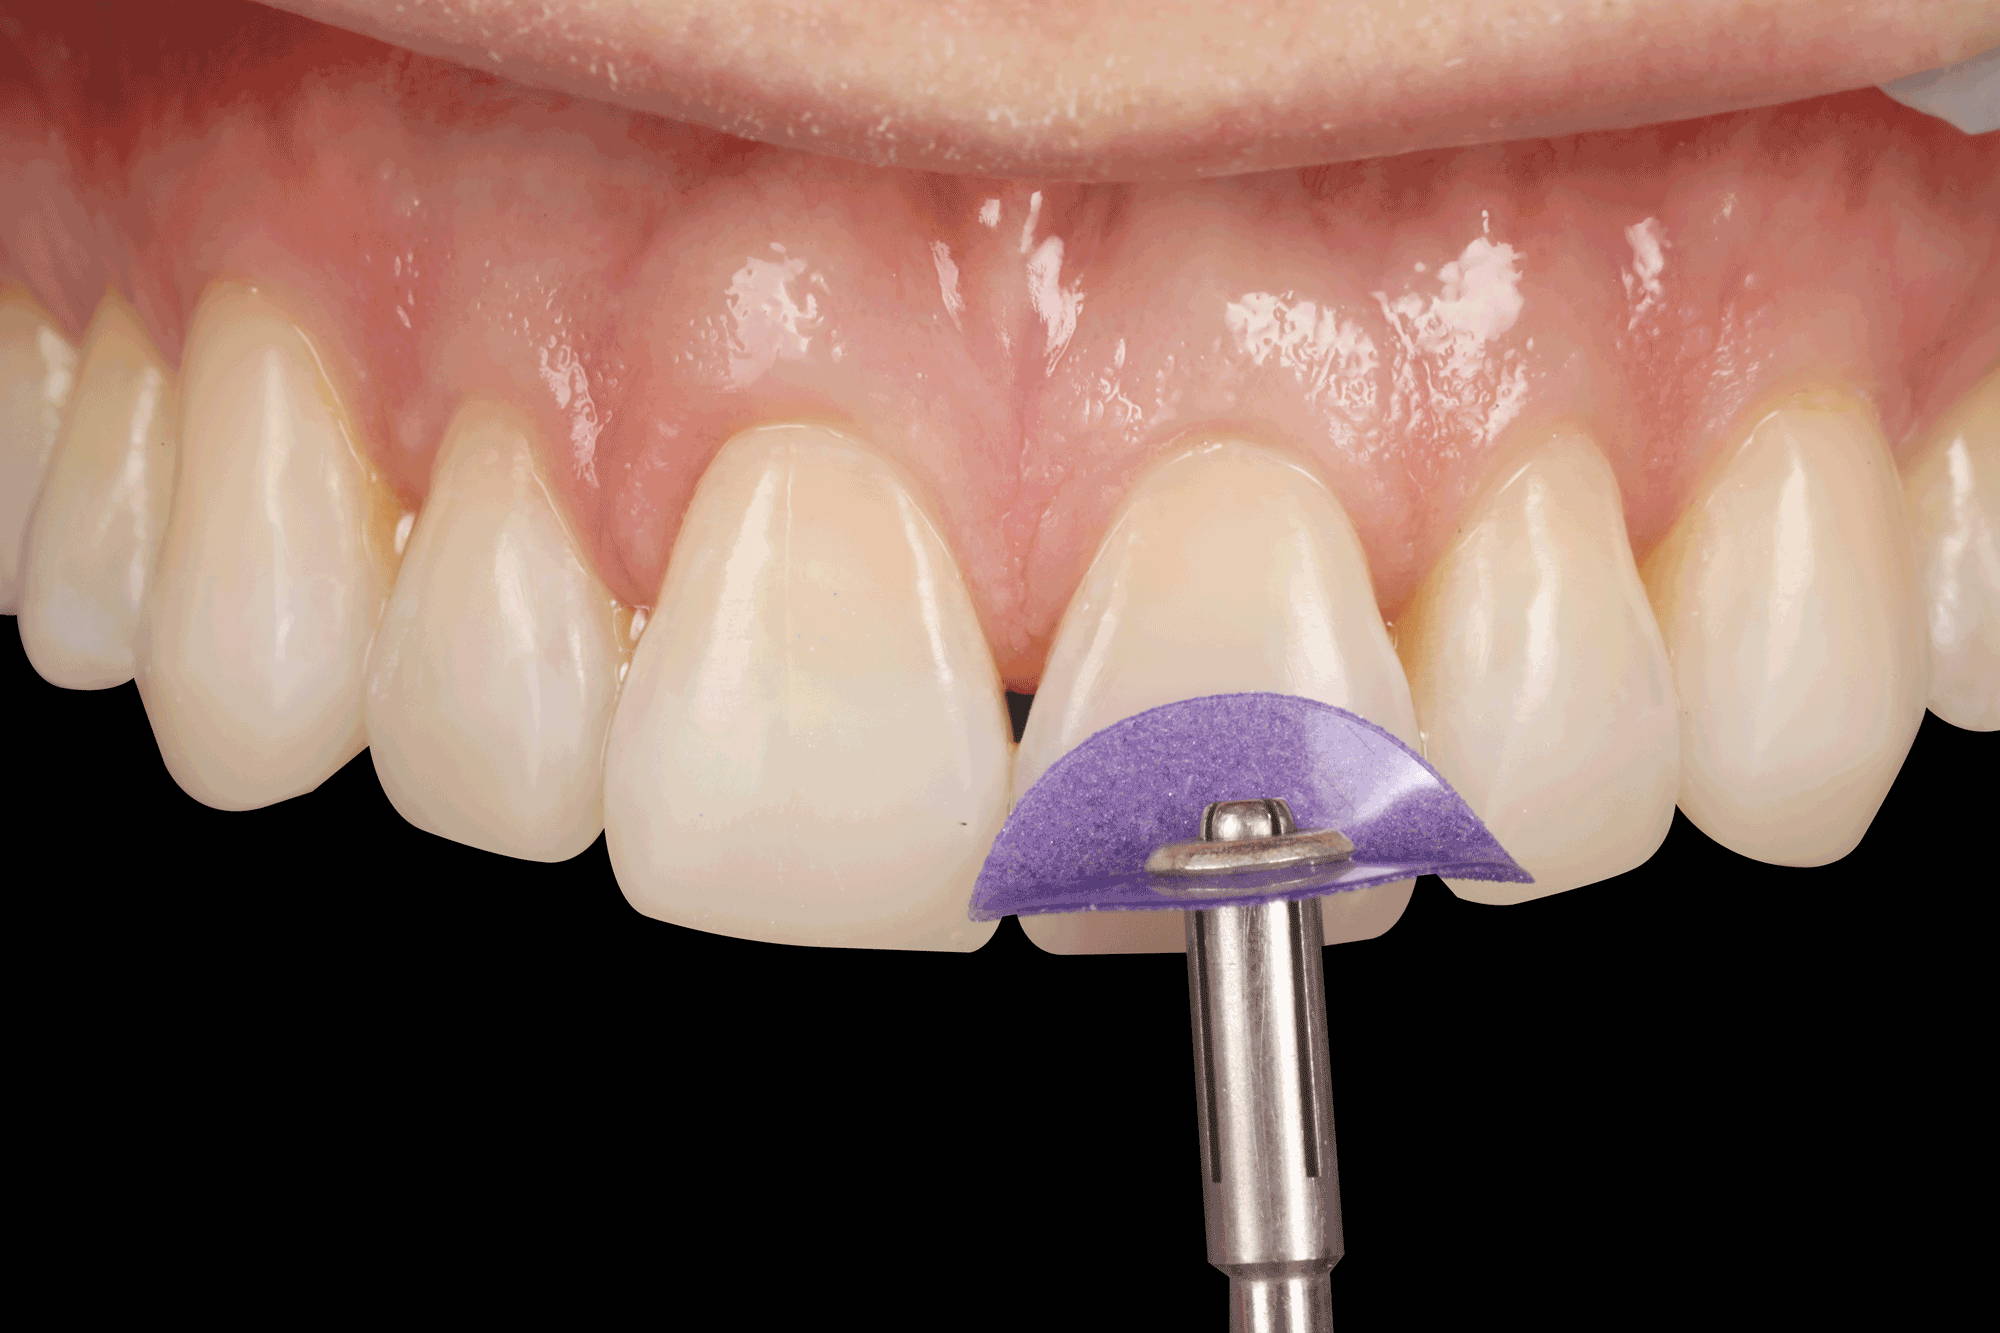
FIG. 13
Finishing and refining of the primary anatomy is achieved using Contours Finishing and Polishing Discs (Clinician’s Choice) in sequence from coarse to superfine.
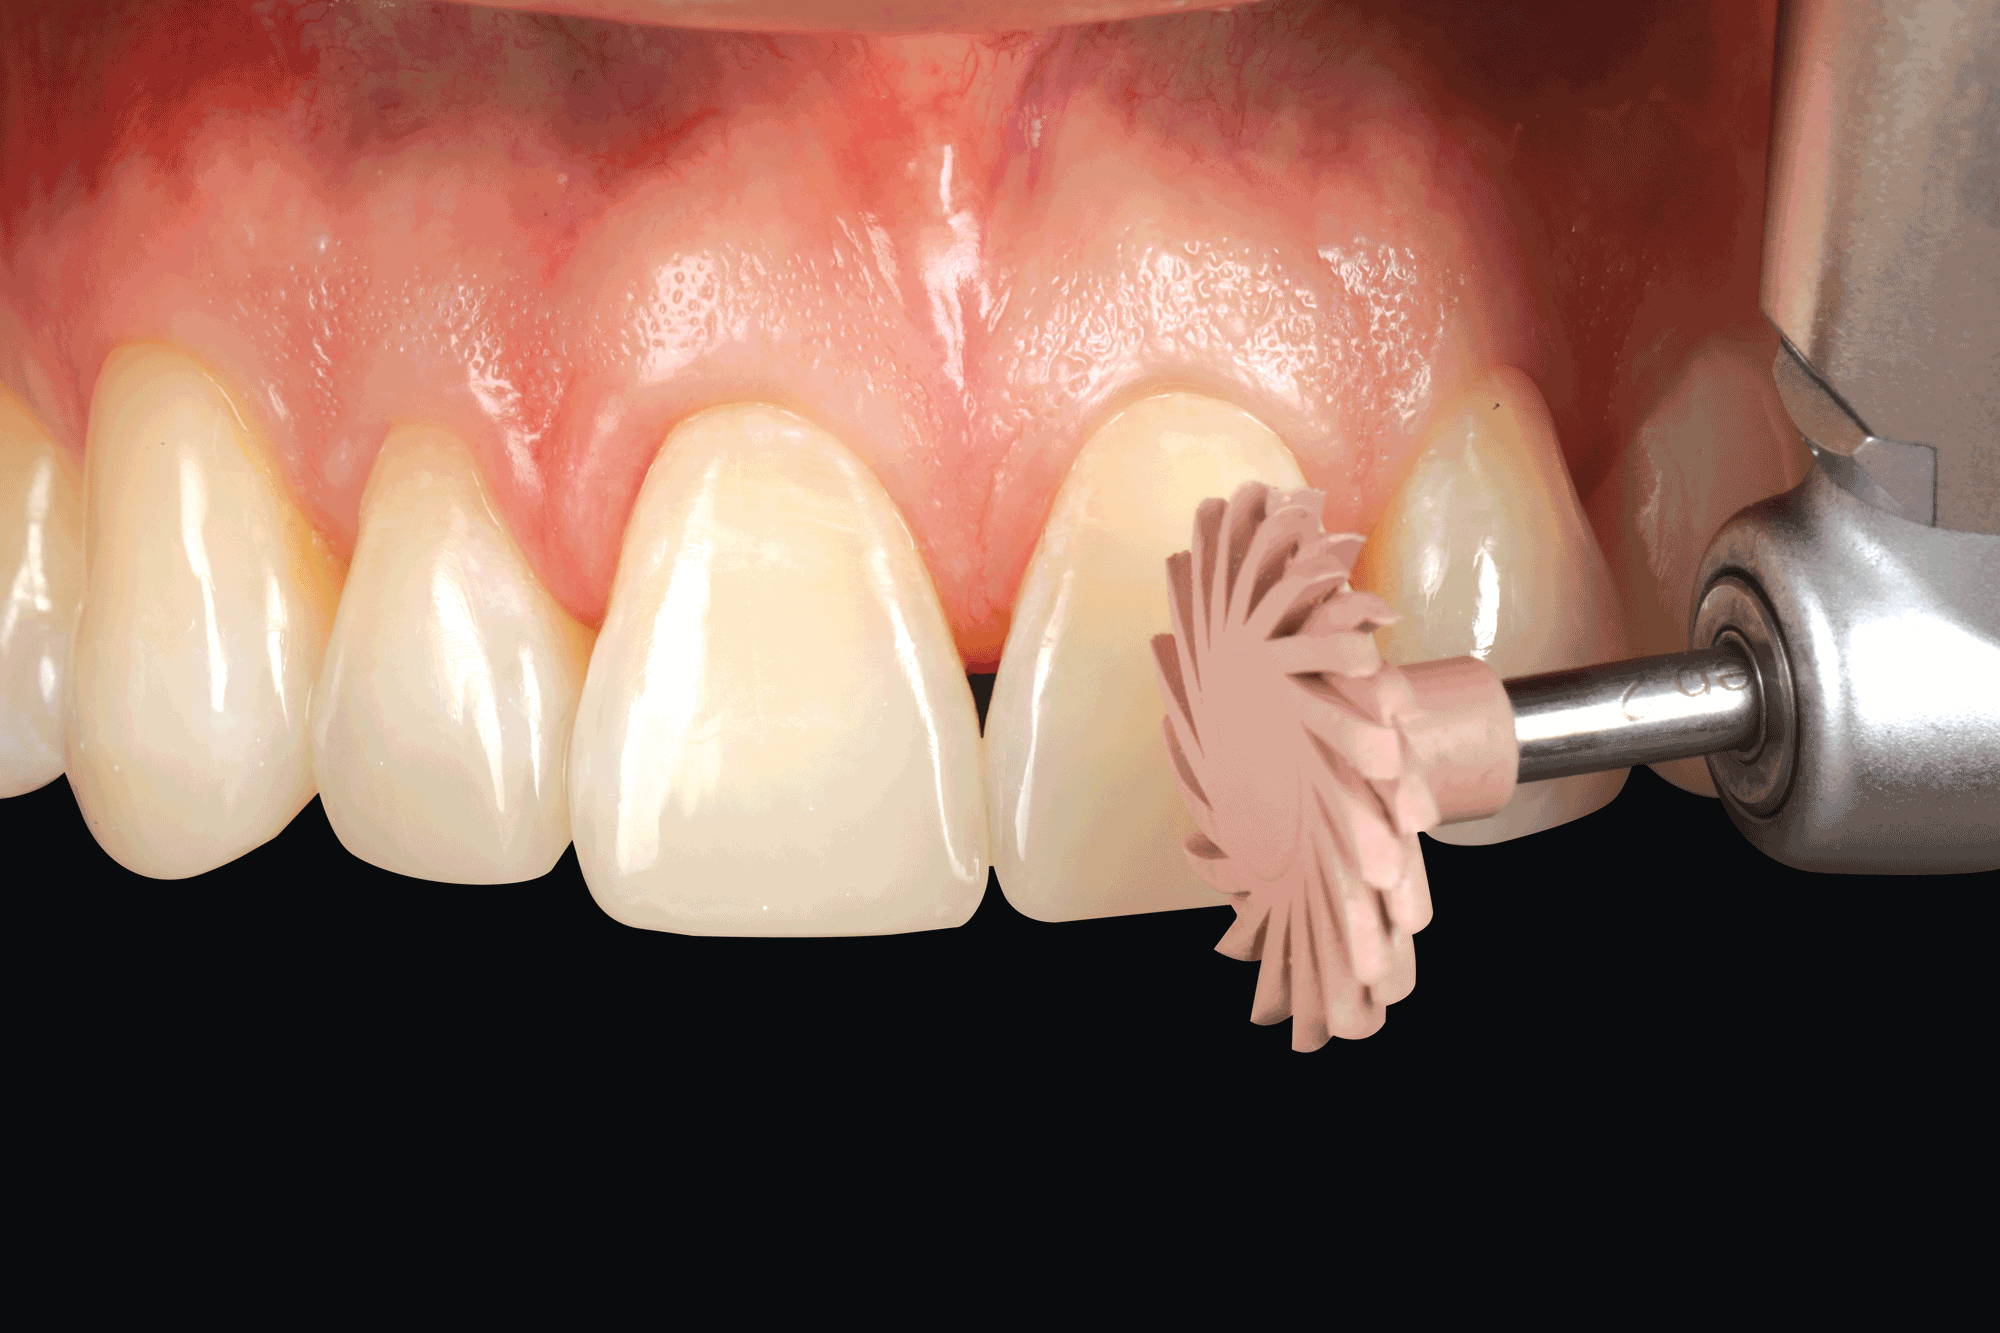
FIG. 14
The high luster of the final restorations is quickly attained using A.S.A.P. 2-step diamond polishing system (Clinician’s Choice). The peach Final High Shine Polisher is shown here. This step is preceded by the purple Pre-polisher. Light pressure at 10- 12000 rpms for 15–30 seconds per restoration is recommended.
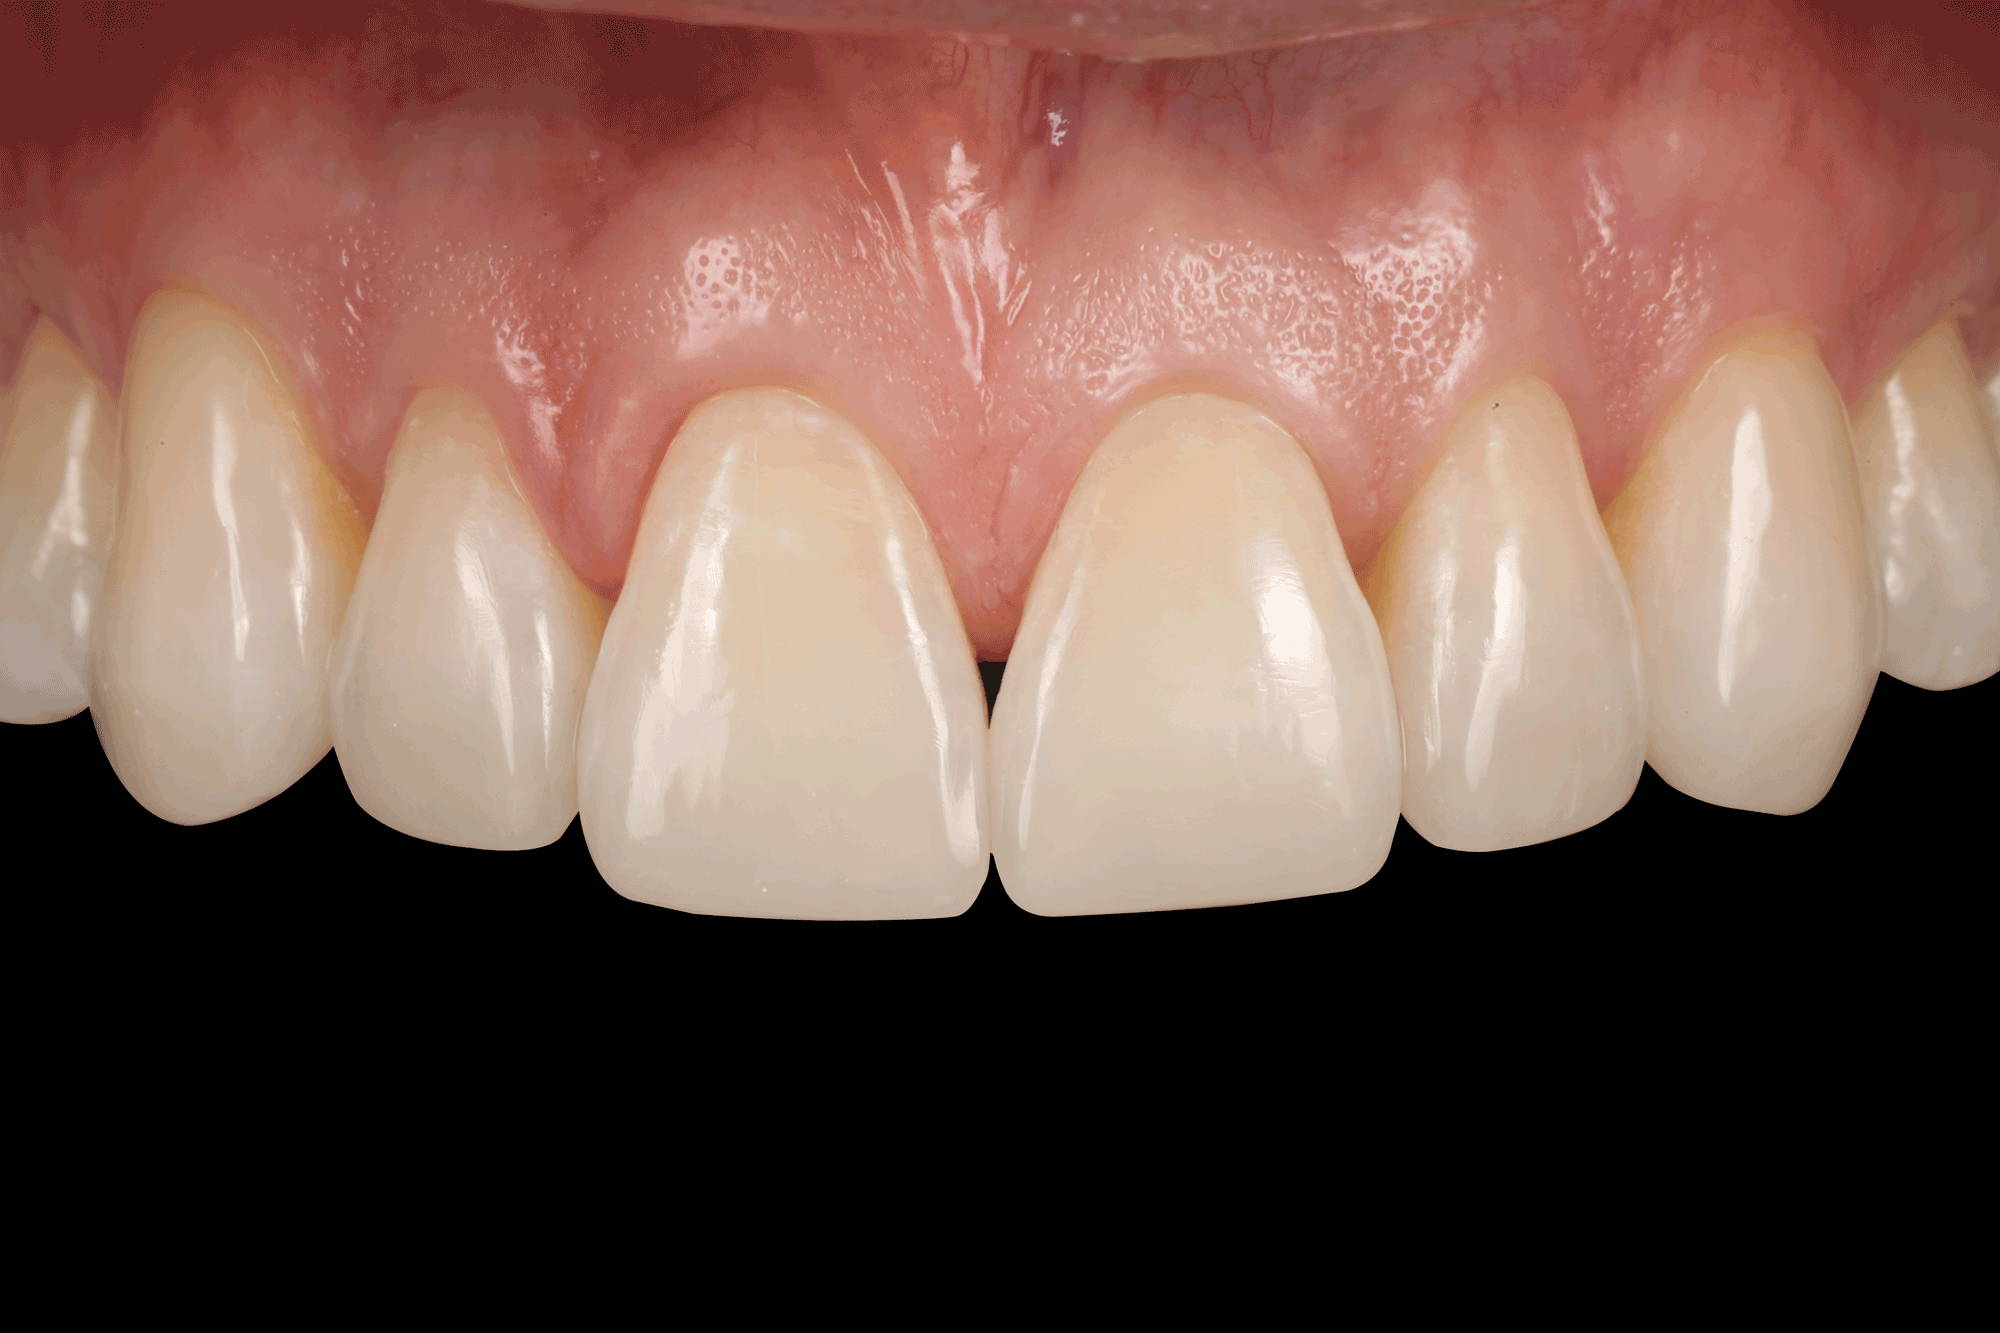
FIG. 15
Immediate post-op showing natural form, function and esthetics being restored to the worn dentition.
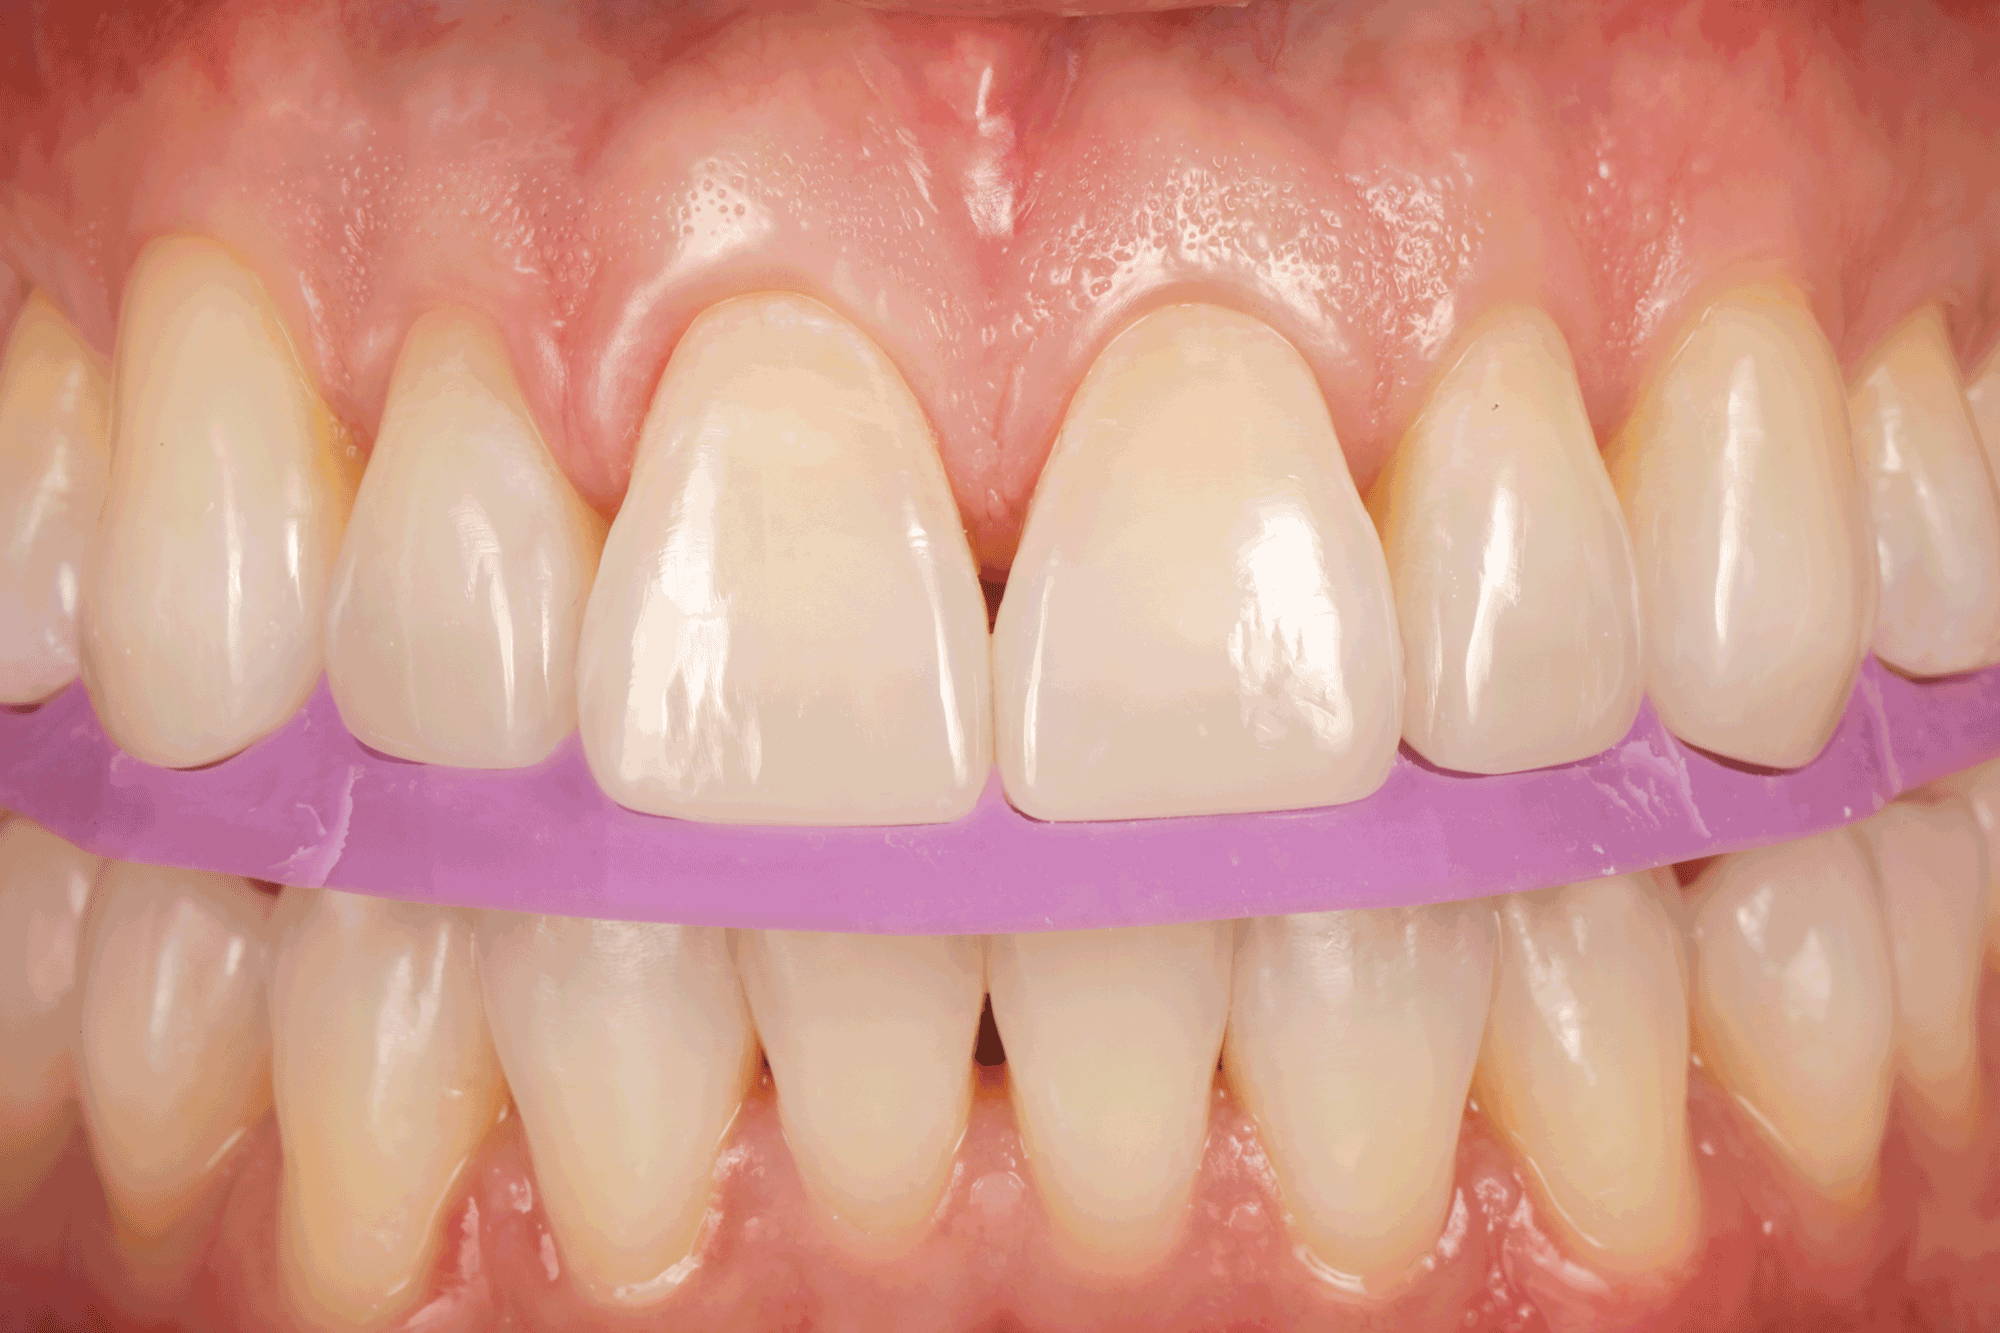
FIG. 16
The lingual matrix is seamlessly replaced onto the final restorations, confirming the accuracy and value of the functional intraoral composite mock-up.
The lingual matrix was immediately placed back onto the finished restorations and confirmed the fit of the new restorations to the ideal scenario established at the mock-up stage. (FIG 16)
These restorations are being carefully followed up, highly esthetic, and functioning very well over time without undo wear or fracture.
This case not only underscores the importance of an accurate diagnosis and treatment planning but also highlights the optional use of conservative composite restorations to restore excessively worn teeth without the further removal of tooth structure. Improvements in the overall strength, esthetics, and handling of composite material have made it a legitimate treatment option in cases involving the worn anterior dentition. Furthermore, in contrast to a wax-up on mounted models, a carefully constructed composite intraoral mock-up that can be accurately impressed and transferred to the prepared teeth can lead to an efficient
and predictable composite restorative solution. The worn anterior dentition is often treated with porcelain laminate veneers; however, this case demonstrates the ability to treat these cases with composite and without compromise, reflecting today’s desire for minimally invasive dentistry.
About the Author

Newton Fahl, DDS, MS
Dr. Newton Fahl Jr. received his DDS degree from Londrina State University, Brazil, in 1987. In 1989 he received the
Certificate in Operative Dentistry and Master of Science degree from the University of Iowa, USA. Dr. Fahl is an Adjunct
Professor of Operative Dentistry at the University of North Carolina. He is a member of the American Academy of Esthetic Dentistry, founding member and past president of the Brazilian Society of Aesthetic Dentistry, and past president
of the Society for Color and Appearance in Dentistry. He has
published extensively on direct and indirect bonding techniques and is on the editorial board of several peer-reviewed journals. He maintains a private practice emphasizing esthetic dentistry and is executive
director of the Fahl Center in Curitiba, Brazil where
he conducts hands on courses on direct and indirect adhesive
restorations.
Discover More
This article was originally published in the Clinical Life™ magazine: Winter 2023 edition
Clinical Life™ magazine is a premier periodical publication by Clinical Research Dental Supplies & Services Inc. Discover compelling clinical cases from Canadian and US dental professionals, cutting-edge techniques, product insights, and continuing education events.
Subscribe to our emails to receive articles like this and be notified about our exclusive promotions.