Ultimate Aesthetics Using Non-VITA Shades for Diastema Closure
Spaces between anterior teeth are a common occurrence, and for some, this can be an unattractive feature that they may be looking to correct, especially spaces in the midline. A practical, non-invasive, economical way to close those spaces is with the use of direct resin composites.
Translucency exists to some extent in all teeth. The degree of translucency is determined by extension of the dentin proximally and incisally and the characteristics of the enamel surrounding the dentin. Fortunately, in most cases, Class III and IV restorations, as well as diastema closures, can be achieved with the use of a single enamel or body (universal) opacity. Areas of higher proximal and incised translucency can present significant restorative challenges when the need for increased translucency exceeds that of the "enamel like" composite.
These restorations require the use of a composite of lower opacity than the typical VITA enamel shades. With the popularity of teeth whitening ever increasing, so has the need to account restoratively, if necessary, for the diminished translucency seen in the whitened tooth. Therefore it is necessary to consider including non-VITA enamel composites of varying translucencies in one’s direct restorative inventory.
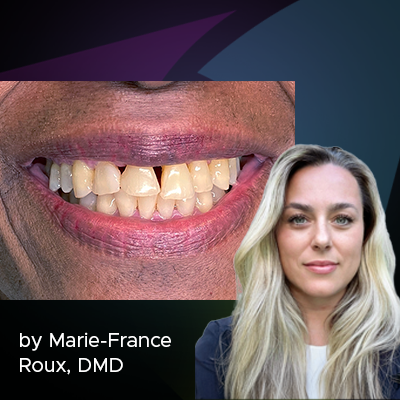
(Fig. 1) shows a diastema closure that does not reflect the translucency of the restored tooth due to the use of a composite that was too opaque. The solution was to replace these diastema restorations with a bleach non-VITA shade of enamel composite. Rubber dam isolation protects against moisture and blood contamination to ensure ideal conditions for adhesive placement and composite manipulation. Once the old restorations are removed and the teeth are rendered back to their original state, the degree of proximal and incisal translucency can be evaluated (Fig. 2). In this case, an enamel composite with more translucency than a VITA enamel shade would be necessary. Evanesce™ Enamel FX White (Clinician’s Choice®) was chosen for its 70% opacity. If the translucency was higher, the Evanesce FX Enamel Incisal at 60% opacity or Evanesce FX Enamel Clear at 50% opacity may have been necessary.
The mesial, lingual and full facial surfaces of both teeth were etched with 35% Phosphoric acid followed by the application of MPa MAX Adhesive (Clinician’s Choice®). After air-thinning and polymerization of the adhesive, one increment of Evanesce Enamel FX White was adapted to tooth 11. It was adapted to the desired contour and tooth width using a thin bladed REJ #04 composite instrument (Clinician’s Choice®) blending it across the facial surface (Fig. 6) then light-cured. A mylar strip was not necessary as the sculptability of the Evanesce Enamel FX White composite allowed for its careful manipulation and contouring to its desired form prior to polymerizing.
Tooth 21 was subsequently restored using two increments of Enamel FX White (Clinician’s Choice®). After the second increment was thinned across the facial enamel with an REJ #04 composite instrument (Fig. 8), a #3 composite brush lightly coated with ResinBlend LV (Clinician’s Choice®) was used to gently smooth and blend the FX White into the surrounding tooth (Fig. 9). Ideal proximal contact and gingival embrasure were established using the pull-through technique. (Fig. 13). This technique requires a mylar strip to be pulled facially while maintaining light pressure on the lingual, drawing the composite interproximally. Any subgingival excess was removed and final blending of the composite was achieved with an REJ #04 composite instrument (Clinician’s Choice®) before polymerizing.
As the two restorations were lightly connected after polymerization, dental floss was used to separate them from each other (Fig. 12) alternatively, they can be gently torqued apart with an instrument. Due to careful placement and contouring of the restoration before light-curing, (Fig. 14) the only finishing required was the adjustment of the incisal embrasures using a Contours™ Finishing and Polishing Disc. (Fig. 16) (Clinician’s Choice®)
A high lustre polish was quickly attained using the 2-step diamond-impregnated A.S.A.P.™ All Surface Access Polishers (Clinician’s Choice®). The purple Pre-polisher (Fig. 15) was used in a wiping motion at 8000 RPM over each restoration to create a smooth surface. This was immediately followed by the peach Final High Shine Polisher used in the same fashion to create a very high polish in under one minute.
The final restorations mimic the existing translucency of the proximal surfaces of #11 and #21, (Fig. 17) made possible by the 70% opacity Evanesce Enamel FX White (Clinician’s Choice®), one of three available non-VITA enamel opacities from the Evanesce line of composite. While the majority of Class III and IV composites as well as diastema closures are restored using VITA single shade opacities, there is a need, from stand-alone restorations such as diastema closures to small enamel defects, for enamel shades of decreasing opacities to account for the varying translucencies that can occur in the natural anterior dentition.
Clinical Technique
About the Author
Marcos Vargas, BDB, DDS, MS
He spent two years, 1990 to 1992, in the AEGD program at the Eastman Dental Center in Rochester, New York. Dr. Vargas received his Certificate and Master Degree in Operative Dentistry in 1994 at the University of Iowa where he is currently a Professor in the Department of Family Dentistry. His primary research interests are in the area of dental materials including glass ionomers, dentin bonding, composite resins and esthetic dentistry. Dr. Vargas is also recognized for his expertise of Direct Restorative Treatment Procedures and conducts numerous lecture and hands-on seminars in the US and internationally. Dr. Marcos Vargas has published extensively in the area of dental adhesion and resin composites for over 25 years. He maintains a private practice limited to Operative Dentistry with an emphasis on esthetic dentistry.
Discover More
This article was originally published in the Clinical Life™ magazine: Winter 2021 edition
Clinical Life™ magazine is a premier periodical publication by Clinical Research Dental Supplies & Services Inc. Discover compelling clinical cases from Canadian and US dental professionals, cutting-edge techniques, product insights, and continuing education events.
Subscribe to our emails to receive articles like this and be notified about our exclusive promotions.