Predictable Treatment Technique for Solving the Black Triangle Dilemma
Improving esthetics in the anterior area of the mouth is one of the biggest reasons that our patients seek out treatment.
This article will discuss the treatment of mandibular black triangles using anatomically shaped mylar matrices and injection molding heated composite resin utilizing the Bioclear Method. It is the author’s opinion that this is the most conservative and most predictable way to treat such esthetic dilemmas. If unfamiliar with this technique, clinicians may want to consider its merits as it does not involve any sacrifice of healthy tooth structure, and it embraces the concept of “additive only dentistry”.
Black triangles are a common esthetic issue from which many of our adult patients suffer. These open gingival embrasures cause the patients to look older, be self conscious and collect food and plaque on a daily basis¹. Surveying patients has shown that they dislike black triangles more intensely than either dark teeth or crowded teeth². Often times, this will cause them to search the Internet for ways and treatments to help them close these spaces.
Why Bioclear?
What would be the reasons why a clinician would adopt a new technique or change the way they perform a procedure? In our office, we ask the question, “How does it benefit the patient?” The Bioclear Method is most definitely a way in which the patient benefits in the long run. The biggest and simplest reason is the conservation of enamel. This is achieved through the clinician being able to perform an additive versus a resective procedure, allowing the “banking” and preservation of enamel.
Various other techniques to close these black triangles involve the use of flat mylar or even a posterior (metal) sectional matrix which are often manipulated in frustration when trying to adapt them to the anterior tooth. Other documented attempts use a preop waxup and a lingual putty matrix to guide composite placement. These techniques still leave a lot of unpredictability at the gingival, subgingival and lingual areas. Is it not always better to use the right tool for the job at hand? When using the Bioclear matrix in conjunction with a rubber dam, anatomic subgingival contour is achieved with ease.
Clinical Technique
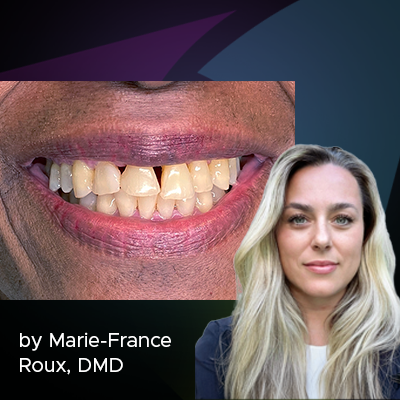
FIG. 1
Preoperative photo. Patient was unhappy with black triangles present.
FIG. 2
Original Anterior Bioclear Matrix demonstrating preformed gingival curvature (bottom of photo)
• When using the new colour-coded BT matrices the BT Gauge allows for quick selection of the appropriate matrix according to the size of the black triangle
When using the Bioclear matrix in conjunction with a rubber dam, anatomic subgingival contour is achieved with ease.
The other traditional treatment for black triangles is the use of porcelain veneers. This allows for predictability interproximally as contours can be established from the subgingival interproximal area in the lab, but they come with a large physiologic and biologic cost-loss of patient enamel. It is for certain that the Bioclear Method identifies with clinical philosophies that are much more conservative in nature, as it does not require traditional preparation of the tooth.
Patient Centered Treatment Planning
Having the Bioclear Method in our toolbox of techniques, it causes us to reflect on how we will treat these patients and what types of discussions we will be having with them regarding their treatment options. Once informed, patient desires usually lie in the realm of colour uniformity, no preparation of tooth, no tissue inflammation, no black triangles, no staining, no roughness, no floss tearing, and an assurance that the restoration will be as strong as porcelain3.
Design Details
With the quote by Alina Wheeler in mind, “Design is intelligence made visible,” let us breakdown the technique to see what makes sense to you, the reader. The design principles of the Bioclear Method can be summarized by these features:
The 5 Cornerstones of the Bioclear Method:
Removal of biofilm before bonding.
Preparations for composite maximizing enamel involvement (pertains more to posterior restorations as anterior restorations have minimal to no prep).
The use of clear anatomically shaped mylar matrices.
Injection molding warm 3M Filtek composite.
Establishing the final “rock star” polish.
It is important to highlight that part of this technique is minimal hand manipulation of the composite. This is because it can contribute to seams, gaps and voids which can lead to early esthetic failures4. It is important to highlight that by injection molding the composite you are minimizing the possibility of early esthetic failures that are associated with seams, gaps and voids that may be created with hand manipulation during composite placement.
Go Slow To Go Fast
If longevity, excellence and patient satisfaction is our desired outcome, it is worth taking a little more time to pay extra attention to detail. Yes, this sometimes means taking additional steps which may “slow us down”, but there will be reward in the outcome. An example of this lies in the first cornerstone of the Bioclear Method; the blasting away of biofilm from the tooth prior to bonding. To do this adequately, we need to visualize the biofilm by painting on disclosing solution (Fig. 3). After rinsing, we can now see the remaining biofilm stained pink (Fig 4).
In order to achieve the most ideal long-term bond to enamel, meticulously blasting biofilm away using a pressurized aluminum trihydroxide/water slurry in a Bioclear Blaster is the best method (Fig 5). Simply etching of the tooth is not enough for predictable biofilm removal.
Failure to remove the entirety of the biofilm may result in peripheral staining of the tooth to restoration interface and premature failure of the bonded composite.
Prior to placement of the Bioclear matrix, the TruContact sander is used at the contact area. This has a dual function: first, it removed the biofilm present within the contact that the Blaster could not reach. Second, it will lighten the contact point allowing the ease of entry of the Bioclear matrices.
Technique Tips
Biofilm Removal
Remove biofilm and stain immediately prior to restoring the tooth
Only use Bioclear Blasting Powder as its aluminum trihydroxide composition is hard enough to remove biofilm but soft enough to not alter tooth structure
Operate the Blaster at a distance of 2-5mm from the tooth surface, keeping it angled at 90˚ to the surface being cleaned
Once the teeth have been “blasted”, rinsed and dried it’s time to place the Bioclear matrix in the mesial and distal positions. Tuck the matrix beneath the rubber dam by using the rigid Bioclear explorer to ensure a perfect subgingival matrix/tooth interface or margin. After placement, in some cases the Bioclear matrices overlap on the facial. If this occurs, trim them back to leave a small gap between the two matricies which allows for venting of excess injection moulded composite.
Once the tooth is isolated with the Bioclear matrix as seen in Fig. 6, the stage is set for injection molding. The tooth is acid etched, rinsed and dried. Then Scotchbond Universal adhesive (3M) is placed using a mop type brush (Fig. 7). Air thin the Scotchbond Universal adhesive to drive off the solvent and prevent pooling, especially at the gingival interface. It is important to note that at this stage, since there is no exposed dentin present, the adhesive is NOT light cured, only air thinned.
Then heated Filtek Supreme Ultra Flowable followed with heated Filtek Supreme paste (3M) are injected slowly and under pressure into the anatomic space formed by the two matrices - each step being helped by the previous step to keep flowing smoothly. It is important to follow one with the other relatively quickly as cooling of the composite takes place within the first 20-30 seconds. Overfilling the matrix space is part of the technique as this allows room for cutback when shaping and polishing.
The clinical convenience with this technique is that the matrix will always seal itself off subgingivally, often eliminating the need to finish or polish the restoration with burs in the interproximal area afterwards.
Both the flowable and paste composites are heated to the optimal temperature of 158 degrees F or 70 degrees C using the Bioclear HeatSync Composite Warmer (Fig. 8). Numerous studies have shown the benefits and the safety of heating composites resins prior to use in the mouth, (Fig. 5-7) Interestingly, Filtek is now, as of 2020, the only composite resin to be approved by the FDA for use in its heated state. Some of the other benefits of the Filtek resin for the Bioclear Method are: the exact color match between the flowable and the paste composite (not a guarantee with every company), the nanotechnology of the Filtek resin filler and it’s superior polishability.
Heating both the flowable and paste resin eases the advance of material (by making it more liquid) into the small, sometimes tight spaces where the matrix- tooth interface is at too acute of an angle for room temperature paste composite. After matrix removal, that trusted mylar finish is left intact and in contact with the gingival tissue. This allows for the beautiful newly established curvature to be easily flossed and sets the stage for future good gingival health (see radiograph Fig 9).
Technique Tips
Composite Heating
Pre-heat the HeatSync for 15 minutes to reach its optimal temperature of 68˚C (155˚F) prior to use.
Heat the 2 HeatSync Composite guns loaded with composite, 2 flowable syringes and up to 6 composite compules for 5-10 minutes before dispensing.
Do not leave composite in the HeatSync when not in use. Maximum time for composite to remain in the HeatSync is 60 minutes.
FIG. 3
Disclosing solution applied to enamel surfaces that will be etched.
FIG. 4
Biofilm becomes visible after disclosing solution is rinsed away.
FIG. 5
Bioclear Blaster removing biofilm.
FIG. 6
Bioclear matrices in place, setting the stage for injection molding.
FIG. 7
Placement of bonding agent prior to injection molding.
FIG. 8
HeatSync Composite Warmer
FIG. 9
Post operative radiograph. A typical radiograph of a restored case using the Bioclear method.
FIG. 10
Pre-operative and postoperative case result with black triangles closed.
Technique Tips
Composite Injection Molding
Transfer individual compules and syringes directly from the heater to the tooth to maximize composite flowability.
Maintain light downward pressure on the matrices as the composite is injected, avoiding the possible dislodgement of the band coronally.
Filtek Supreme Ultra Flowable composite is injected mesially and distally until it reaches the incisal and visible lingually. Always inject all composites slowly and under pressure against the matrix thereby avoiding any air bubble formation.
Immediately inject the Filtek Supreme Ultra composite into the flowable. Apply at approximately a 45° to the interproximal, slowly moving back and forth mesial to distal, filling towards the incisal.
Inject the Filtek Supreme Ultra composite until it emerges out of the matrix band facially, forming the “umbilicus”.
Lastly, the Bioclear Method can be used to regenerate lost or flattened papillae. By restoratively re-establishing the interproximal contact gingivally within 5.5 mm of the interdental crestal bone, as demonstrated by Tarnow, regeneration of the papilla incisally to its proper position will take place 8.
The ultimate goal with the Bioclear Method is to create a monolithic, highly polished restoration. Monolithic because the end strength of the restoration will be higher than a layered restoration. Highly polished because this is what creates the stain resistance. The polish that is achieved with the Bioclear Method is something that gives the clinician ultimate satisfaction. The simplified 3-step “rock star” polish (3M Coarse Disk, Magic Mix paste (Bioclear), Shape and Shine cup (Clinician’s Choice)) will always deliver a mirror-like finish. Following each of these steps is crucial to achieving the long-term stain resistance and excellence we desire for our patients when eliminating their black triangles. (Fig. 10). This technique of using modern adhesive dentistry is sure to please both clinician and patients in search of the ultimate in esthetics and conservatism.
Technique Tips
Rockstar Polish
Incisal and facial composite excess can be removed quickly with a coarse flame-shaped diamond, leaving 1-2mm of composite short of the desired finish position.
Use a coarse finishing disc to remove the remainder of excess and continue to contour until all of composite has uniform scratches.
Apply Magic Mix using a soft, flexible prophy cup, utilizing the splaying of the cup to reach subgingivally.
Final polishing is achieved with Shape and Shine cups, either #05 or #01.
Initially, use the Shape and Shine cups without water applying more pressure than typical, then repeat this step with water and the same pressure until the desired lustre has been achieved.
REFERENCES
1. Ko-Kimura N, Kimura-Hayashi M, Yamaguchi M, et al. Some factors associated with open gingival embrasures following orthodontic treatment. Aust Orthod J. 2003;19:19-24
2. Cunliffe J,Pretty I. Patient’s ranking of interdental “black triangles” against other common esthetic problems Eur J Prosthodont Resto Dent. 2009;17:177-181.
3. Clark D. Injection Overmolding for aesthetics and strength, Part 1. Dent today. 2014;Aug:86-89
4. Kim J. The Dawn of Injection Molded Composite Dentistry. Dent today. 2019; May issue.
5. Agre M. et al. Physical and Esthetic Properties of a Warmed Dental Composite. J Dent Res Vol #98A, Abstract #1670, 2019.
6. Abdulmajeed A et al. Fatiguing and Preheating Effect on Mechanical Properties of Composite Resins. J Dent Res Vol 98A, Abstract #1879,2019.
7. DaronchM, Rueggeberg FA, Hall G,et al. Effect of composite temperature on in vitro intrapulpal temperature rise. Dent Mater, 2007;23:1283-1288
8. Tarnow DP, Magner AW, Fletcher P. The effect of the distance from the contact point to the crest of bone on the presence or absence of the interproximal dental papilla. J Periodontol. 1992;63:995-996
About the Author
Taras Konanec, DDS
Dr. Taras Konanec is co-owner of Drummond Dental Group in downtown Montreal and Faculty Lecturer in Operative Dentistry and Practice Management of McGill University. Dr. Konanec DS’97, completed a postgraduate residency program at the Royal Victoria Hospital following the ompletion of his dental degree from McGill. Dr. Konanec has always been involved in teaching and continuing education. In his 21st year of being a part-time faculty lecturer at McGill, he is involved in the restorative department teaching in operative dentistry, as well as the practice management course. He is the 2018 recipient of McGill Faculty of Dentistry’s Ralph Silverstone Teaching Award.
Discover More
This article was originally published in the Clinical Life™ magazine: Winter 2020 edition
Clinical Life™ magazine is a premier periodical publication by Clinical Research Dental Supplies & Services Inc. Discover compelling clinical cases from Canadian and US dental professionals, cutting-edge techniques, product insights, and continuing education events.
Access previous publications, request print editions, or subscribe to our Newsletter now. Join our thriving dental professional community and take your practice to new heights!
Subscribe to our emails to receive articles like this and be notified about our exclusive promotions.